Create a user
Add a single new person to the current school. Once created, the user is available to add to groups and will be included in the next sync to connected platforms (Google Workspace, Entra, Active Directory).
Before you start
- You must be an admin for the school you want to add the user to.
- Make sure you are working in the correct school — check the school name shown in the top-left switcher.
- If you need to add many users at once, see Import users in bulk instead.
Steps
Step 1: Open the Users page
Select Users in the left sidebar.
The Users list for the current school opens.
Step 2: Start a new user
Select Add user in the top-right corner of the page.
The "Add user" form opens.
Step 3: Choose a role
Select the Role from the dropdown:
- Admin — full system access
- Mentor — teacher / support staff
- Learner — pupil / student
- Observer — limited, read-only-style access for someone who needs to look people up but never manage them
- Governor — member of the governing body
- Ofsted — inspector access, typically used during an inspection
See User roles explained if you are unsure.
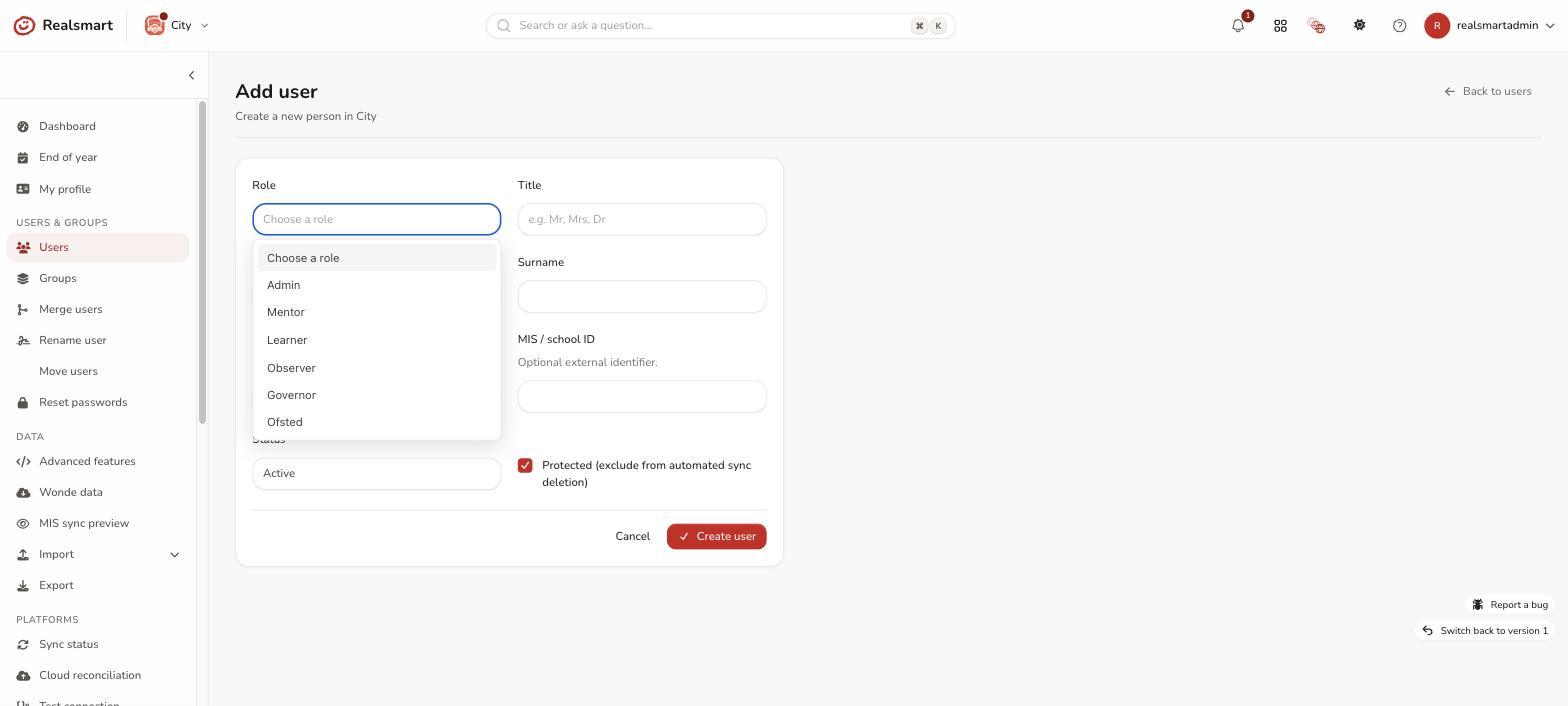
Step 4: Enter the user's name
- Title — optional (e.g. Mr, Mrs, Dr)
- First name — required
- Surname — required
Step 5: Set the username
Enter a Username. The username:
- Must be unique within this school
- Cannot contain spaces
- Forms the basis of the person's Google Workspace or Entra email address
If your school uses Google Workspace, the email will be [email protected].
Step 6: Enter the UPN or staff code
Enter the UPN (for a pupil) or Staff code (for everyone else) — the field is labelled to match the role you chose in step 3. It is required.
This is the id your MIS knows the person by. Type it exactly as it appears — or will appear — in your MIS. It is how this hand-made account gets matched to their MIS record when the MIS starts sending them; get it wrong and the sync creates a second account for the same person instead.
If you don't know it yet, look it up in your MIS before creating the account. If your school replaces staff codes with MIS IDs, the caption under the field says so.
Step 7: Set status and other options
- Status — leave as Active for a normal account. See User statuses for other options.
- Protected — tick this to exclude the user from automated sync deletions (prevents Smartsync from removing the account if they are absent from MIS data).
Step 8: Create the user
Select Create user.
Result
The new user appears in the Users list for the current school. They will be provisioned to connected platforms (Google Workspace, Entra, etc.) at the next sync, or you can trigger a sync immediately from the Sync status page.
Troubleshooting
- "I can't see the Add user button" — you may not have admin access to this school, or you may be in MAT overview mode. Switch to the specific school first using the school switcher in the top-left.
- "Username already exists" — usernames must be unique within a school. Try a different format (e.g.
jsmith2instead ofjsmith). - "Someone else in this school already has that UPN / Staff code" — two people in one school cannot share one, because the sync has no way to tell them apart and would keep updating whichever record it found first. Find the person who already has it (search the Users list for the code) and check which of the two is wrong. If both are genuinely correct, the value is wrong in your MIS and needs fixing there.
- "The UPN / Staff code field is required" — every new account needs one, so the MIS can be matched to it later. Look the value up in your MIS; if the person genuinely isn't in the MIS and never will be (a governor or an inspector, say), enter the code your school uses for them so the field is still unique to that person.
- "I need to add many users" — use Import users to upload a CSV file.
Related
Did this work for you?
If a step looked different on your site, tell us and we'll update the screenshots.
Thanks for your feedback.