Edit a user
The user edit page is the central place for everything to do with one person — their details, how they sign in (password, 2FA, login times), group memberships, guardians, sync logs, and classroom data.
Before you start
- You must be an admin for the school the user belongs to.
- The edit page has seven tabs: Details, Security, Memberships, Guardians, Logs, Classroom, and Cloud. Each tab handles a distinct area.
- When you edit another admin and you hold Manage other admins' access, an extra Access tab appears — use it to set what that admin can do. See Reduced admin access.
Steps — finding and opening the edit page
Step 1: Open the Users page
Select Users in the left sidebar.
Step 2: Find the user
Use the search field, filters, or scroll the list to find the person, then select their name to open their record. (The name is the link — there is no separate Edit button.)
The edit page opens on the Details tab.
Details tab
The Details tab shows and lets you update the user's core information.
Fields:
-
Role — Admin, Mentor, Learner, Observer, Governor, or Ofsted. See User roles. Changing it also adds the person to that role's group (mentors, learners, and so on), which is what puts them in the matching group in Google or Entra. They stay in their old role's group as well — remove them from it on the Memberships tab if they shouldn't be there.
-
Title — optional (Mr, Mrs, Dr, etc.)
-
First name and Surname
-
Username — unique within the school; cannot contain spaces
-
UPN (pupils) / Staff code (everyone else) — the id your MIS knows this person by, held in the same field for both; the label follows the Role dropdown. You can edit it. For an account you created by hand it is the only place the value exists, so this is where a typo gets fixed, and getting it right is what stops the MIS creating a second account for the same person. For a user your MIS already owns, an edit here lasts only until the next sync overwrites it — correct it in the MIS instead. The caption under the field tells you which of those two you are looking at. If your school replaces staff codes with MIS IDs, the caption says so.
Two people in one school cannot share a UPN / staff code, so changing it to one someone else already has is rejected — the sync has no way to tell them apart. Members who already share one are left alone: you can still edit their name, role or status without being stopped, and the check only applies when you actually change the code itself.
-
Status — Active, Suspended, Locked, or Deleted. See User statuses. ("Pending suspension" isn't one of the choices here — it's a flag ADAdmin raises automatically, not something you set on this dropdown; see that doc.)
-
Protected — tick to exclude the user from automated sync deletions
-
Google display name — only shown when your school syncs to Google. Changes how this one person's name appears in Gmail, Classroom, Chat and the other Google apps, without changing your school-wide Display name setting. Each option in the list shows the name it would give this person. Pick School default to go back to the school setting.
Option Example Title, initial and surname Mr J Smith Title, first name and surname Mr John Smith Title and surname Mr Smith First name and surname John Smith Initial and surname J Smith "Student", first name and surname Student John Smith First name only John Surname only Smith The title options are for staff only, and the "Student" option is for students only. If you change someone's role to one their choice doesn't suit, it goes back to School default. The name is built from their current details every sync, so it follows a name change from your MIS. If someone has no title, the title options use their first name instead. Their first and last name in Google stay as your school setting has them, so the Google Admin directory and search are unaffected. Saving pushes the change to Google straight away, or at the next sync at the latest. Going back to School default removes the display name Realsmart set in Google.
From your MIS
Below the editable fields, a From your MIS panel shows what your MIS holds for this person. Every field in it is read-only — correct it in the MIS and it updates here on the next sync.
- MIS ID — this user's record id in your MIS.
- Sync ID — the id your MIS feed actually matches this person on. Which one that is, is a setting per school and per user type: it may be their UPN / staff code, their MIS ID, or their Wonde ID, so the caption names the one in use. This is the field to check when someone is being duplicated or missed by the sync. (When it is the UPN / staff code, that field is the editable one on the form above.)
- Job title — the job title as it exists in your MIS. Staff only.
- Staff type — Teaching staff or Non-teaching staff. Staff only. If your school uses Settings → Teaching staff to decide which job titles count as teaching, the panel says the value came from those rules. When you change the rules, this user keeps their current staff type until their next sync — the panel warns you when a change is due.
- Subjects — the subjects this staff member is attached to in your MIS, teaching attachments first. Staff only. If subjects sync is off for the school, or the subjects sync hasn't run yet, the panel says so instead of showing an empty list. All subjects opens the full subjects view (admins with sync settings access).
Save changes
Select Save changes after editing any field.
Other actions on the Details tab
- Sync now — pushes an on-demand sync for THIS user to whichever cloud platforms the school has turned on (Google Workspace and/or Microsoft Entra). This is the same push that happens automatically whenever you save changes, reset a password, or restore/delete the user — the button just lets you trigger it on demand (for example, to confirm a stuck sync without changing anything else). A confirmation shows which platform(s) were queued. If the school has Active Directory or Apple School Manager on instead, those still sync on their own schedule — there is no instant push for them, so the button is greyed out with an explanation when neither Google nor Entra sync is on.
- Password & 2FA — opens the Security tab, where every password, two-factor and login-time control lives.
- What Wonde says — opens the matching record in Wonde data so you can compare ADAdmin against the origin (the MIS, via Wonde). Shown when the user has a Wonde or MIS id.
- Restore user — visible only when the user is deleted; restores them to active.
- Delete user — soft-deletes the user. They are marked Deleted and re-synced (deprovisioned from connected platforms).
Security tab
Everything about how this person signs in, in one place. Each switch saves the moment you change it (there is no separate Save button), and every change is recorded in the audit trail.
Three cues also appear in the header next to the user's status, so you can spot them from any tab: Default password, Must change password, and 2FA on / 2FA not set up. Select one to jump to the Security tab.
Password
The panel says whether the user is on their own password or still on the default password (a red warning — anyone who knows the school default can sign in as them).
- Require a password change at next login — switch it on and they'll be asked to choose a new password the next time they sign in. Turn it off to withdraw that request. For a student who can't change their own password (turned off at school, year-group or user level) the switch is unavailable, because the prompt could never appear — set a password for them instead.
- Reset to default — sets the school's default password for their role and requires a change at next login. Skipped for a student whose password change is disabled. To do this for a whole class, use the Reset passwords page.
- Set a specific password — type the new password and select Set password. It's stored securely and, if password sync is on for the school, pushed to their linked Google or Active Directory account on the next sync.
Two-factor authentication
The badge shows the state: Off, On · set up (they've registered an authenticator app), or On · not set up yet (they'll be walked through setting one up at their next sign-in — nobody is locked out).
- Require 2FA — turns two-factor on or off for this user. If your school requires MFA for all staff or all students, the switch is locked on for anyone that setting covers and can't be turned off per user — the note links to Settings → Password, the only place it can be changed.
- Reset authenticator — for when they've lost their phone or authenticator app. Clears the registered authenticator so they can set up a new one at their next sign-in. It doesn't turn 2FA off, and it's unavailable when no authenticator is registered yet.
Password change
Whether this person may change passwords themselves. For a student it controls their own self-service change on their profile page; for a member of staff it controls whether they can reset other users' passwords. If the school or the student's year group has student passwords turned off, the switch is unavailable and the panel says which level set it.
Login window
Restrict when this user can log in. Enter both times in school local time (an overnight window is allowed) and select Save window.
Don't allow login stops this person signing in to Realsmart at any hour of the day. It affects Realsmart sign-in only — their Google, Microsoft, Apple and Active Directory accounts are left exactly as they are, so it is not a way to suspend or delete an account. A blocked user is shown a notice at the top of this panel, and the Users list shows Login blocked in the Login times column.
Allow login at any time removes a window or a block and puts the person back to unrestricted access.
The same settings can be applied to many users at once from the Users page under Login options — both use the same underlying setting.
Memberships tab
Shows the groups this user belongs to, and lets you add more.
- Add to a group… search box at the top — start typing a group name, then select it from the results. The user is added straight away.
- Remove (×) next to a group — removes the user from that group
- Remove all — removes the user from every group at once (with confirmation)
A membership you add by hand is locked: it is kept even if the MIS stops sending it, and it shows a Locked badge in the list.
You can also add people to a group from the group edit page, or with Add to group from the Users list when you have several to do at once.
If cloud sync is paused for the school, the change is saved in Realsmart now and sent to the connected platforms when sync resumes.
Classroom badges
When Google Classroom is switched on for the school, each group row also carries a badge for whether this person is actually on that group's Google Classroom course, in the role the sync expects:
- In classroom · Teacher/Student — Google lists them on the course, in the expected role.
- Wrong role — Google lists them, but as the other role (for example, a teacher listed as a student).
- Not expected — either they're on the course when the sync no longer expects them there, or they're correctly absent (for example, a locked learner: the sync doesn't keep locked learners on courses, and a suspended account isn't put on one).
- Missing — the sync expects them on the course and Google doesn't list them.
- No classroom — the group isn't linked to a Classroom course.
- Not checked — the group is linked, but nothing has read that course's roster yet, so no claim is made about who's on it. This is not the same as "empty" or "missing".
- Unavailable — the Classroom data couldn't be read just now.
This reads data already synced — the nightly reporting mirror or the write-path snapshot, whichever read the roster more recently — never a live check against Google. Small text next to each badge says how old that reading is.
Only direct memberships get a badge here. Someone can also be on a parent group's Classroom course through nesting; that person's own Classroom tab lists every course they're actually on. To find or fix a group's own link to Classroom, see Find and link a group's Google Classroom.
If the user has no Google account yet, one message replaces the badges.
Guardians tab
For learner accounts — record parent / guardian details and whether to include them in Classroom notifications.
Select Save after adding or editing guardians.
Logs tab
Shows the user's provisioning log history — Google Workspace and Entra sync events, filtered to this user.
Loads on demand (the tab is lazy-loaded for performance).
Classroom tab
Shows this user's Google Classroom data — courses, assignments, and activity.
Loads on demand.
Cloud tab — what Google & Entra say
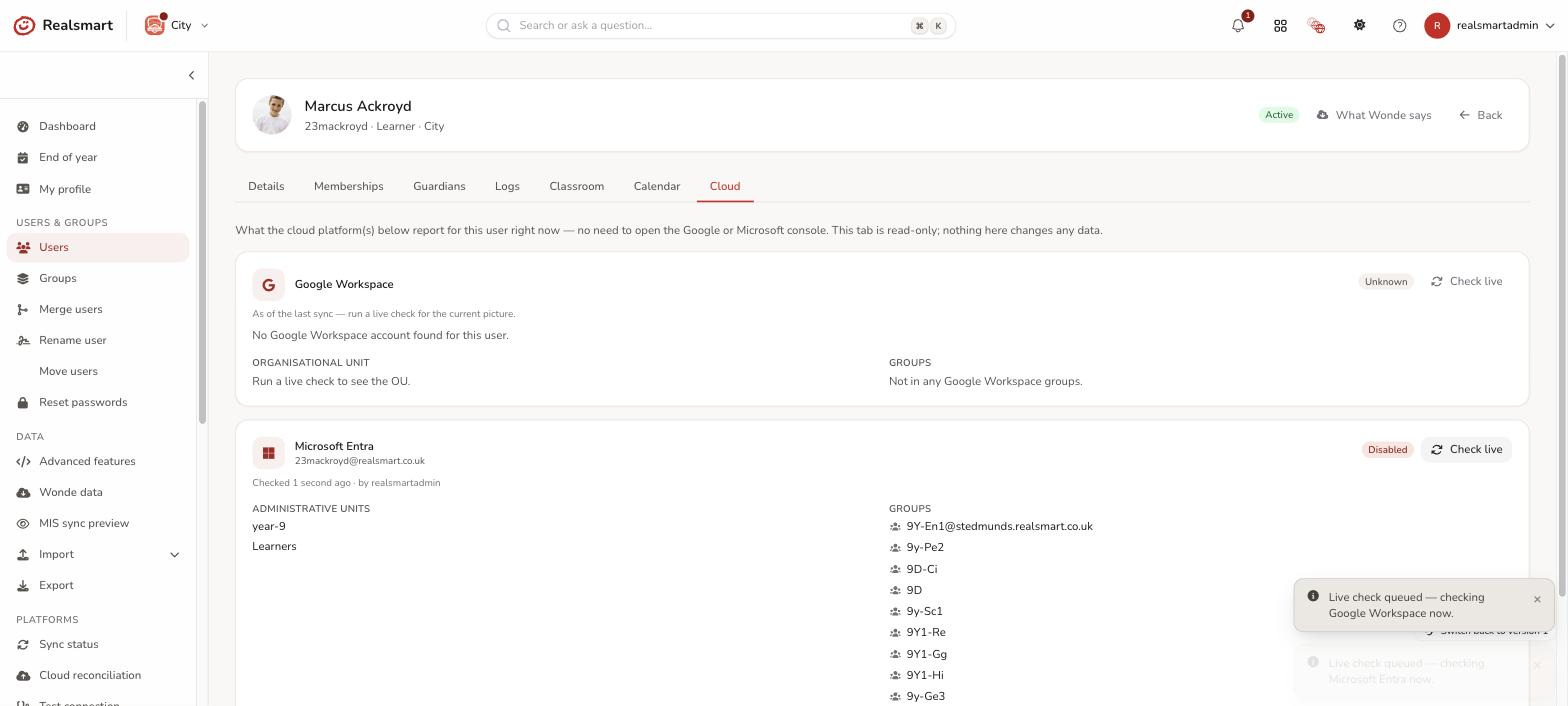
Shows what Google Workspace and/or Microsoft Entra currently report for this user — their organisational unit (Google) or administrative units (Entra), group memberships, and account status (active/suspended, enabled/disabled) — without you needing to open the Google Admin console or the Entra portal yourself.
- Read-only, and needs no Google/Entra login. This tab never changes anything on either platform, and there's nothing to sign into — ADAdmin fetches the data on your behalf using the same credentials the background sync already uses.
- Loads on demand, like Logs and Classroom.
- One card per platform your school uses. If your school has neither Google nor Entra sync turned on, the tab explains there's nothing to show.
- Two kinds of data:
- As of the last sync — an instant first paint from ADAdmin's own records (from the last time the background sync ran). This is what you see the moment the tab opens.
- Live — select Check live on a platform's card to fetch the current picture straight from Google or Entra right now. This can take a few seconds; the card updates automatically when it's done, and shows who ran the check and when.
- A live check may come back not found (no account exists there for this user yet) or with an error (for example, the school's Google/Entra connection needs attention) — either is shown directly on the card.
Troubleshooting
- "I can't find the user" — check you are in the right school; use the filters to search by username or MIS ID.
- "The Delete button is greyed out" — you may not have admin access, or the user is already deleted.
- "I deleted a user by mistake" — select Restore user on the Details tab (visible when the user is deleted).
- "The Require 2FA switch is greyed out" — the school requires MFA for everyone in this user's group (staff or students). Change it under Settings → Password; see Require MFA.
- "I can't require a student to change their password" — their self-service password change is turned off (at school, year-group or user level), so a prompt could never appear. Use Set a specific password instead, or turn their password change back on.
Related
Did this work for you?
If a step looked different on your site, tell us and we'll update the screenshots.
Thanks for your feedback.