Import users and cohorts
Use the Import page to create or update users and group memberships in bulk. The import is a guided wizard that validates everything before anything is queued, so problems are caught while you can still fix them. This is the fastest way to onboard a large number of users at the start of term or to set up cohorts from an MIS export.
This page — the sidebar calls it Advanced user import — sits alongside two other, simpler imports under the same Import group: Password import (set passwords for existing users from a CSV) and Cohort import (add existing users to groups from a CSV). If all you need is one of those, use the simpler page — it's less to fill in.
Before you start
- You must be an admin for the school you are importing into.
- Select the school first. The import always runs against the school you are currently in — switch to it using the school switcher before you start. (You can't import while viewing all schools in MAT mode.)
- Prepare your data with the correct column headers — see the format below. You can either upload a CSV or paste rows copied from a spreadsheet.
CSV format
The import understands the following columns. Only type, username, forename and surname are required; everything else is optional. Column names are matched flexibly (for example first_name, email and role are recognised as forename, upn and type), and any columns it doesn't recognise can be mapped by hand in the wizard.
| Column | Required | Description |
|---|---|---|
type |
Yes | Role: admin, mentor, learner, observer or governor (any capitalisation) |
username |
Yes | Unique login username for this school (letters, numbers and . _ - @) |
forename |
Yes | User's first name |
surname |
Yes | User's surname |
status |
No | ACTIVE, PROTECTED or LOCKED. Leave it blank for the default (see below) |
password |
No | Initial password, at least 8 characters (leave blank for the school's default) |
misId |
No | Internal identifier from your MIS (numeric) |
upn |
No | Email / unique pupil number, as a valid email address. This is how the import recognises a person (see below) |
title |
No | Title (e.g. Mr, Mrs) |
legal_forename / legal_surname |
No | Legal names where they differ from preferred |
year |
No | Year group (numeric) |
house |
No | House name |
admission_number |
No | Admission number (numeric) |
registration |
No | Registration group name |
groups |
No | Groups to add the user to, separated by ; or , |
How the import recognises people
Each row is matched to a person by their UPN. If a row has no UPN, the import uses, in order: the UPN of the existing user with that username, then the MIS ID, then the username itself. So a file with just usernames and names still works. Importing it again later updates the same people instead of adding duplicates.
If a username already belongs to someone with a different UPN, that row is flagged. Add their UPN to update them, or change the username.
Status, and schools that sync from their MIS
When a school's users come from its MIS, the nightly MIS sync suspends anyone the MIS doesn't know about. On those schools a new user with a blank status is added as protected, so the MIS sync leaves them alone. This suits office, supply, test and shared accounts. Setting a new user to ACTIVE is flagged as a warning, because the next MIS sync would suspend them. Protected users can't be changed by a later import: edit them on their user page instead.
On other schools, a blank status means ACTIVE.
Groups that don't exist yet are flagged as a warning and created during the import. Download a template CSV from the Import page to get started.
Files saved as CSV UTF-8 from Excel, or with semicolon or tab separators from a non-UK spreadsheet, are read correctly — as is the same data pasted into the box rather than uploaded.
Steps
Step 1: Provide your data
Open Import in the sidebar. You have two options:
- Upload a CSV — select Download example CSV, fill it in, then upload your file.
- Paste data — copy rows (including the header row) from a spreadsheet and paste them into the box, then select Use pasted data.
Step 2: Map your columns
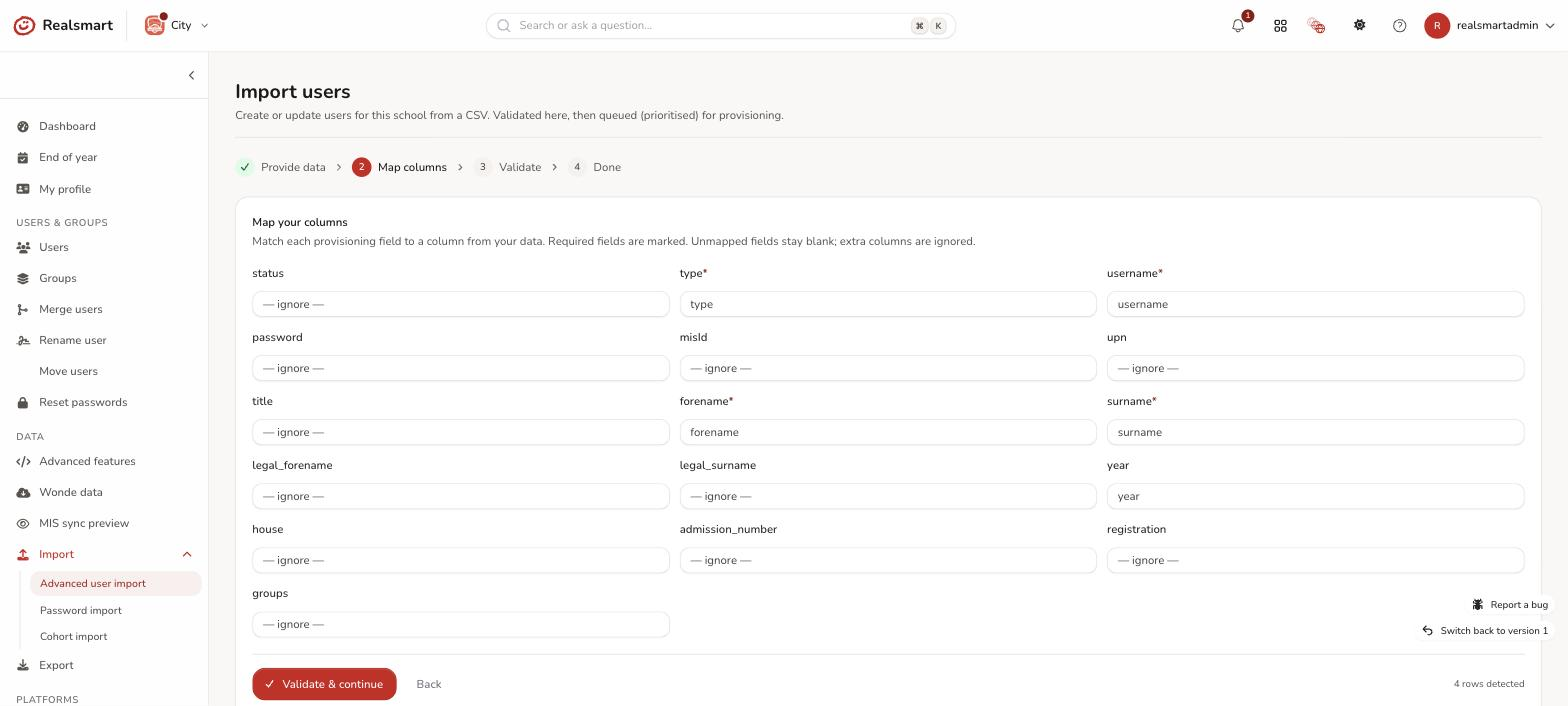
The wizard auto-matches your columns to the provisioning fields. Check the mapping, correct anything that's wrong, and make sure each required field (marked with *) is mapped. Select Validate & continue.
Step 3: Validate
The wizard checks every row and cell: required values, valid roles and statuses, email/UPN format, numbers, names and password length. It also checks for duplicate usernames, UPNs or MIS IDs in your data, and for usernames that already belong to someone else. These are the same rules provisioning applies, so a row that passes here won't be quietly skipped later.
- Rows to fix lists each problem by row, field and reason. Fix them in your source data (or remap), then select Re-validate.
- Warnings (such as groups that will be created) must be acknowledged with the checkbox before you can continue.
- Good to know explains how rows will be sent, such as users who'll use their username as their UPN, or be added as protected. Nothing to acknowledge.
- When everything is valid you'll see a preview and the import becomes submittable.
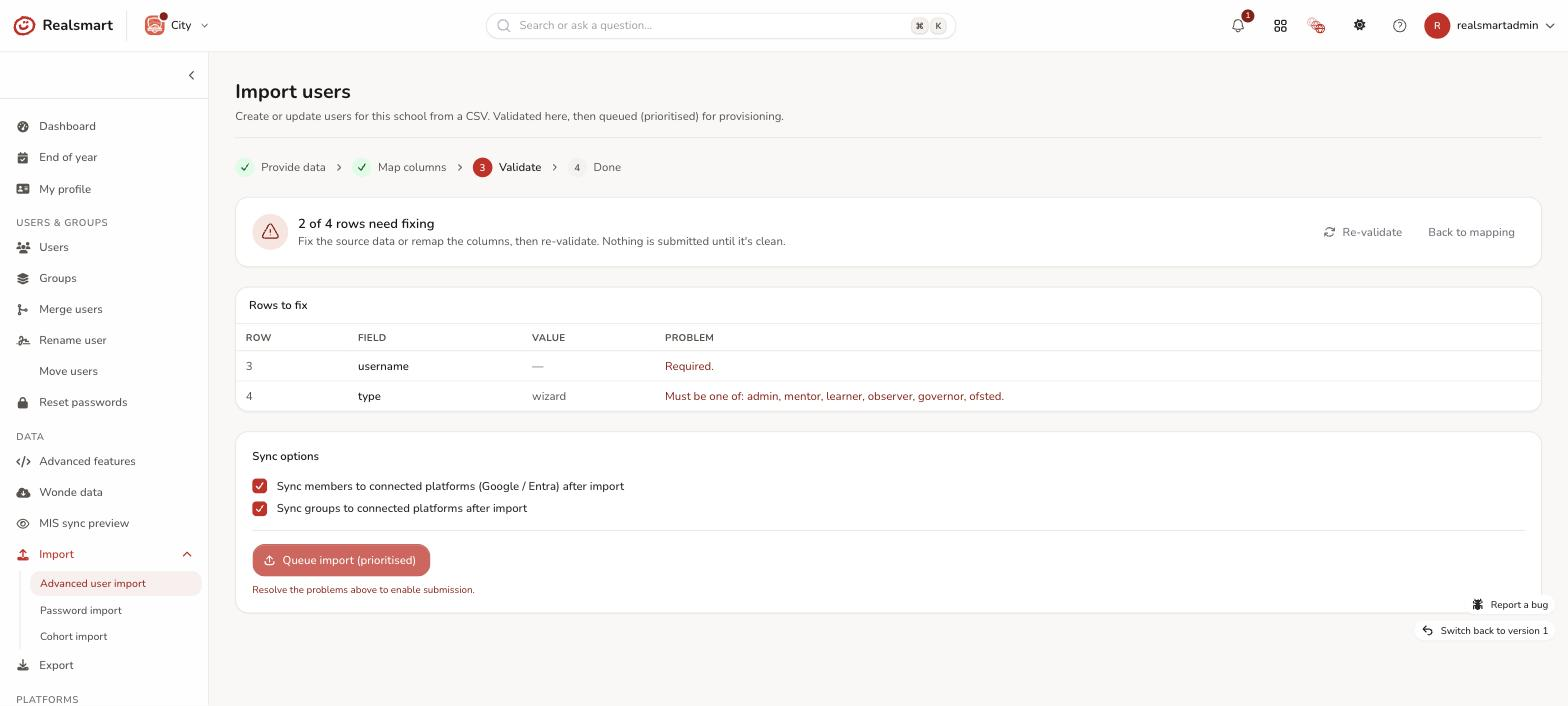
Then choose the import options. Both are off by default:
- Replace group memberships: each imported user ends up in only the groups in your
groupscolumn. Protected memberships stay. Leave it off to add those groups and keep the ones people already have. - Suspend users who aren't in this file: only for a file that lists every user at the school. Everyone active who isn't in it is suspended after 24 hours. Schools that sync users from their MIS don't get this option.
Step 4: Run the import
Select Import users and confirm. The import goes to the front of the provisioning queue, ahead of scheduled syncs, and usually finishes within a minute or two.
Result
The page waits for provisioning, then shows how many users were added, updated, already up to date, left alone because they're protected, or not imported. A row-by-row table lists problems first, with provisioning's reason for each row it skipped. You can leave the page while it runs; the result is also in Logs. Note your reference (e.g. IMP-XXXXXXXX) if you need to ask for help.
If provisioning hasn't finished after 20 minutes, the page says so. Select Check again to keep waiting.
Troubleshooting
- "Map a column to the required field…" — one of the required fields (
type,username,forename,surname) isn't mapped. Pick the matching column on the mapping step. - "Duplicate username/UPN/MIS ID in this import" — two rows share the same value. Each must be unique within a single import.
- "Must be one of…": the
typeorstatusvalue isn't recognised. Use one of the allowed values listed in the format table. - "Already used by…": that username belongs to someone else at the school. Add their UPN to update them, or pick a different username.
- Rows marked "Not imported": the reason column says why. Fix those rows and import just them again.
- "The import didn't run": provisioning is paused for the school (a freeze window), or stopped with an error. Nothing was changed.
- Users I imported were suspended the next day: on a school that syncs from its MIS, users set to
ACTIVEwho aren't in the MIS get suspended. Import them with a blank status (orPROTECTED). - Groups will be created — this is a warning, not an error. Acknowledge it to continue, or create the groups first via Groups if you'd rather control their settings.
- The mapping step shows one column holding the whole row — the file's separator wasn't recognised. Comma, semicolon and tab are all handled, so this points at something more unusual (a pipe, or fixed-width columns); re-save it from your spreadsheet as CSV and upload again.
Related
Did this work for you?
If a step looked different on your site, tell us and we'll update the screenshots.
Thanks for your feedback.