Cohort import
Cohort import (sidebar → Data → Import → Cohort import) adds existing users to existing groups in bulk, from a CSV listing a username and one or more cohort (group) names per row. Like Password import, this writes directly to the database as soon as you start it — there's no provisioning queue and no undo.
What it does and doesn't do
- It only works with users and groups that already exist in the school. Use Import users and cohorts first if you need to create either.
- Unlike the main user import, cohort import never creates a group for you. If a cohort name in your CSV doesn't match an existing group exactly, that row is reported as "not found" and skipped — nothing is auto-created. Create the group first via Groups if it doesn't exist yet.
- Memberships added this way are marked as a protected membership, so a later MIS sync won't automatically remove them — they'll show up for a human decision if they're ever reviewed in end-of-term tidy-up.
- A user already in a listed cohort is simply left alone — no duplicate membership, no error.
Before you start
- You need the data-import permission for the school.
- Select the school first. Cohort import always runs against the school you're currently in — switch to it before you start. (You can't run this while viewing all schools in MAT mode.)
- Make sure the groups you're targeting already exist — check Groups if you're not sure.
CSV format
One row per user, with the username first and one or more cohort names after it. A header row is expected but its exact wording isn't checked — the first line is always skipped, so any header text is fine as long as there is one.
username,cohort,cohort
jbloggs,Year 7,7A
asmith,Staff,
You don't have to build that by hand. Select Download example CSV on the Cohort import page for a ready-made file — replace the example rows with your own and upload it back. The example is deliberately ragged (one row with two groups, one with a single group) because that's allowed.
Files saved as CSV UTF-8 from Excel, or with semicolon or tab separators from a non-UK spreadsheet, are read correctly.
- Column 1 (username) — required. If you paste an email address here, only the part before the
@is used as the username. - Columns 2+ (cohorts) — one group name per column; add as many columns as the most cohorts any one row needs. Blank cells are ignored, so it's fine for some rows to have fewer cohorts than others.
Steps
Step 1: Open Cohort import
With the right school selected, open Import in the sidebar, then choose Cohort import.
Step 2: Upload your CSV
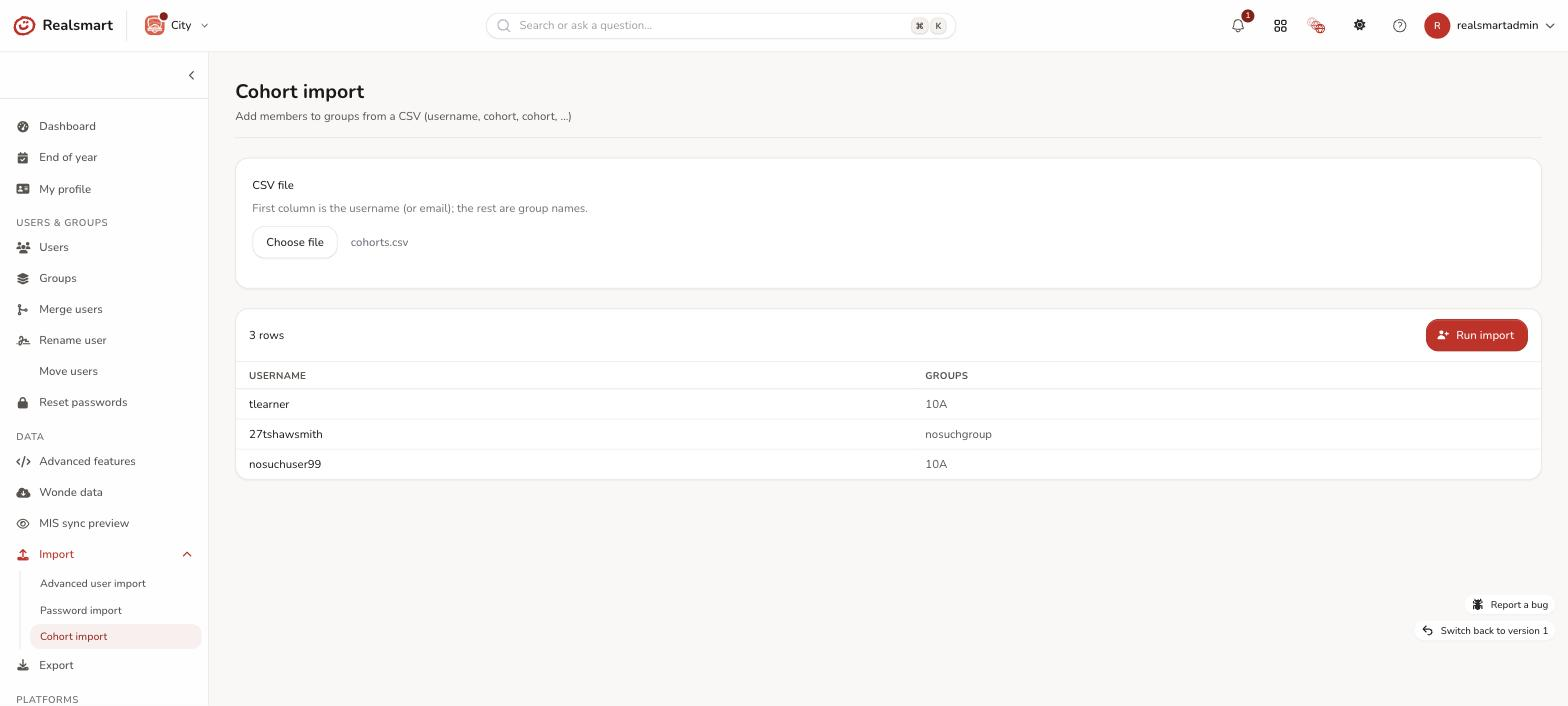
Select your CSV file. If you haven't prepared one, select Download example CSV first and fill that in. The header row is skipped automatically and the remaining rows are parsed into a username plus a list of cohort names each.
Step 3: Start the import
Select Start import. For every row, the user is looked up in this school and — for each named cohort that already exists — added to it (if not already a member). This happens immediately, row by row.
Result
You'll see a summary: how many users were updated (had at least one new membership added) and how many rows had a problem, plus a list of the specific errors:
- "User not found:
username" — no user with that username exists in this school. - "Cohort not found:
name(forusername)" — that group name doesn't match any existing group in this school; it was not created, and that particular membership was skipped (other cohorts on the same row, if found, are still added).
Troubleshooting
- Every row says "Cohort not found" — check the exact spelling of your group names against Groups; matching is exact (case-insensitive) but not fuzzy, and cohort import won't create the group for you.
- "User not found" for someone you know exists — check you're in the right school, and that the username column doesn't have extra whitespace or the full email where only the username part is expected.
- A user isn't showing the new group afterwards — confirm the row's cohort name matched by checking the summary error list; a silently-skipped "not found" cohort won't add anything.
- "No user rows were found below the header row." — the file has nothing under its first line. Remember the first line is always treated as a header and skipped, so a file with no header row loses its first user; add one. This message also appears for a file saved in an old Mac-only CSV format — re-save it as CSV or CSV UTF-8.
Related
Did this work for you?
If a step looked different on your site, tell us and we'll update the screenshots.
Thanks for your feedback.