Password import
Password import (sidebar → Data → Import → Password import) sets passwords for existing users in bulk. There are two ways to do it, chosen with the Upload CSV / Use wizard toggle at the top of the page: upload a CSV of username,password rows you've already prepared, or use the guided wizard to filter a group of members and have Realsmart generate the passwords for you. Unlike the main user import, both are a direct, immediate write to the Realsmart account — there is no priority queue, no processing delay, and nothing to undo once it's done. Getting that password on to Google, Entra or Active Directory is a separate, slower step — see When the new password reaches your platforms.
This is higher-risk than a normal import — read this first
- The passwords are real, plaintext credentials. Whatever is in the
passwordcolumn becomes that user's actual login password the moment you start the import. There's no masking, hashing-before-upload, or preview of the password values themselves. - It writes directly to the Realsmart account — no queue, no delay. The main user import goes through the provisioning queue and you track its outcome in Logs; password import updates the database straight away, synchronously, while you watch. Your connected platforms are the exception — those are updated later, on their own schedule (see below).
- There is no undo. Once a password is set, the only way to change it back is to import (or reset) it again.
- Handle the CSV file itself like a credentials list. Delete it from your downloads/desktop once you're done, and never email or share it insecurely — it's a plaintext list of who has which password.
- Every password written this way is recorded in the audit trail as an update to that member, attributed to you.
Before you start
- You need the data-import permission for the school.
- Select the school first. Password import always runs against the school you're currently in — switch to it in the school switcher before you start. (You can't run this while viewing all schools in MAT mode.)
- Only usernames that already exist in this school are updated. Password import never creates a new user — use Import users and cohorts for that.
CSV format
The file needs exactly two columns, with this exact header row:
| Column | Required | Description |
|---|---|---|
username |
Yes | The existing username in this school |
password |
Yes | The new plaintext password for that user |
username,password
jbloggs,Str0ngTemp!23
asmith,AnotherPass!45
Rows with a blank username or blank password are skipped. There's no column mapping step — the header must name those two columns, in that order.
You don't have to type that header yourself. Select Download example CSV on the Password import page for a ready-made file with the header row and two example rows in it — replace the example rows with your own and upload it back.
The header is matched loosely enough to survive normal spreadsheet habits: capitals and stray spaces are ignored (USERNAME , Password is fine), and files saved as CSV UTF-8 from Excel or with semicolon or tab separators from a non-UK spreadsheet are read correctly.
Upload a CSV
Step 1 — Open Password import
With the right school selected, open Import in the sidebar, then choose Password import. Make sure Upload CSV is selected (it's the default).
Step 2 — Upload your CSV
Select your username,password CSV file. If you haven't prepared one, select Download example CSV first and fill that in. The file is read immediately and matched against this school's users — nothing is written to any account yet at this point.
Step 3 — Check the matched/unmatched preview
Each row shows its username and whether it matches an existing user in this school. Usernames that don't match won't be updated when you proceed — double-check for typos here before continuing, since there's no per-row correction step.
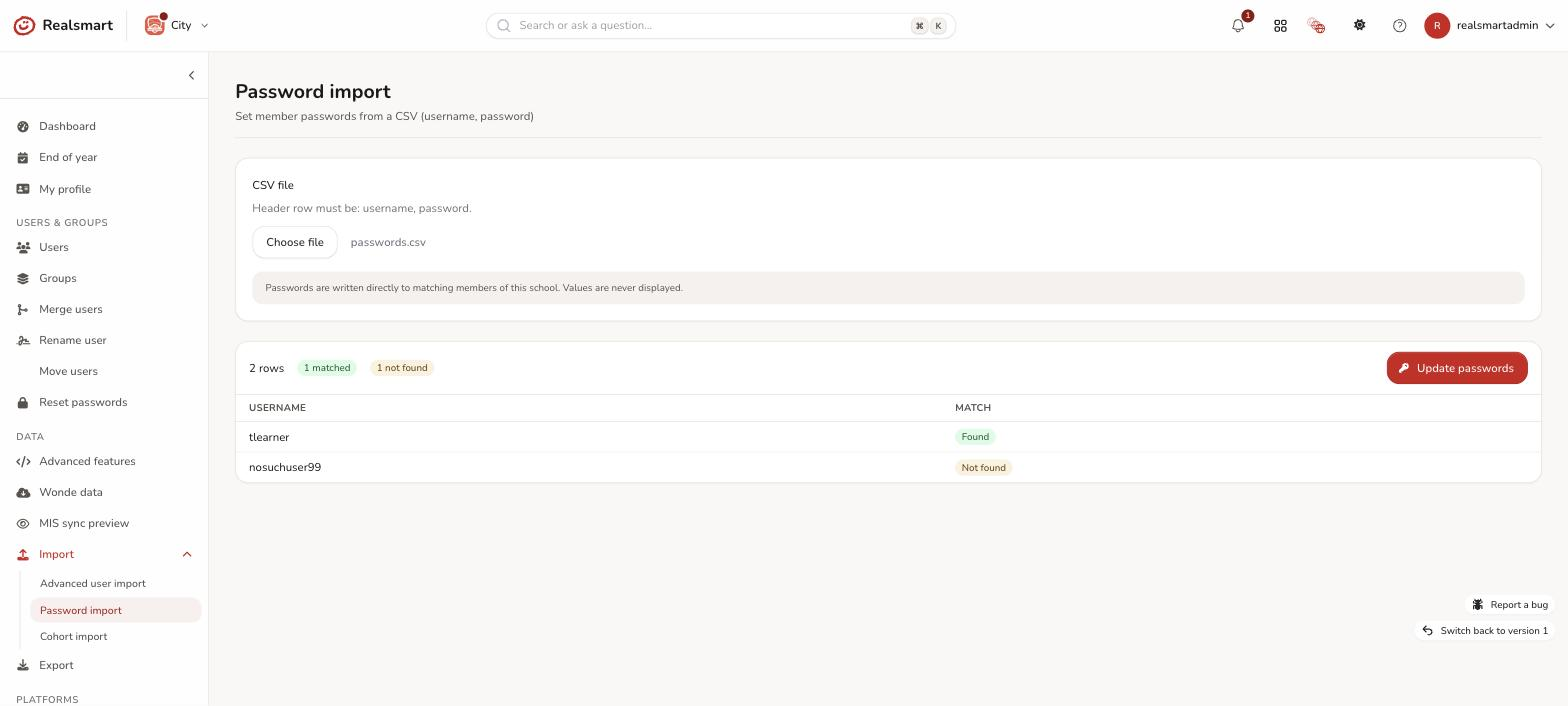
Step 4 — Start the import
Select Start import to write the passwords. This happens immediately for every matched row — there is no confirmation dialogue beyond this button, so make sure the preview looks right first.
Result
Every matched user's password is updated straight away. You'll see a summary count of how many passwords were updated. Unmatched usernames are silently skipped (they were never in this school under that username). The action is written to the school's log as a member update, attributed to you.
When the new password reaches your platforms
The write is immediate in Realsmart — the user can sign in here the moment the import finishes. Getting that same password on to a connected platform is a separate step on that platform's own schedule, and only where the school has turned password syncing on. This is the same for the CSV upload and the wizard.
| Platform | When the new password arrives there | Only if |
|---|---|---|
| On-premise Active Directory | Soon after the import — the password is queued immediately and applied the next time your on-premise connector checks in | Sync passwords to AD is on (Sync settings → Active Directory) |
| Google Workspace | The next overnight sync run | Sync passwords to Google is on, and the member's user type is not ticked under Skip password sync for these user types (Sync settings → Google Workspace) |
| Microsoft Entra | The next overnight sync run | Update password for existing users is on (Sync settings → Microsoft Entra) |
| Apple School Manager | Not applicable — Realsmart never sets Managed Apple ID passwords | — |
So on a typical school day: the new password works in Realsmart at once, in Active Directory shortly after, and in Google and Entra the following morning.
Need Google or Entra sooner? Run a manual sync for that platform straight after the import — it is the same job as the overnight run, scoped to your school. See Trigger a manual sync. There is a short cooldown between manual runs per platform.
If a password never reaches a platform, the usual cause is that platform's password-sync switch being off, rather than the import failing — check the switch in the table above first, then View sync status and logs.
Use the guided wizard instead
If you don't already have a prepared CSV, select Use wizard at the top of the Password import page. Instead of uploading a file, the wizard filters members for you and generates the passwords itself — there's nothing to prepare beforehand. It carries the same real-time, no-bulk-undo consequence as the CSV upload above; the only difference is how the target members and the passwords are decided.
Step 1 — Filter who this applies to
Choose any combination of three filters: user types (Learner, Mentor, Admin and so on), year groups, and groups (search and add one or more). Leave them all empty to target every active member in the school. When more than one is set they combine — a member must match a selected user type and a selected year group and be in one of the selected groups. A running count shows how many members currently match as you adjust the filters. By default only active members are included; tick Include suspended and inactive members to widen that. Deleted members are never included either way.
Use the user type filter when a group contains staff. Class and teaching groups usually hold the teacher as well as the pupils, so filtering by group alone would reset that member of staff's password along with the children's. Tick Learner to target the pupils only. The Preview step shows each member's type in its own column, so you can check the batch before anything is written.
Step 2 — Choose a password strategy
-
Generate random passwords — a unique, unambiguous 12-character password for every matched member.
-
Use a pattern — build every password from one template containing exactly one of two tokens:
{random_5_digits}(a fresh random 5-digit number per member) or{incrementing_5_digits}(00001, 00002, … in list order). Everything else in the template is kept as literal text — e.g.chevy_{random_5_digits}might producechevy_48213. As you type, an example password appears below the field; an invalid pattern (missing a token, or using both) shows its error right there before you continue. -
Random words — a short passphrase of simple words joined with dashes, for younger pupils who have to read a password off a card and type it:
spill-beans,acorn-stork-quick. Choose 2, 3 or 4 words; each member gets their own random combination, and no password is ever shorter than 8 characters (two words is always at least 9). The words come from a fixed list of short, everyday, age-appropriate words, and a password never repeats the same word twice. Live examples update under the picker as you change the word count.2 words is much easier to guess than a 12-character random password. It's the right trade for infant and lower-primary pupil accounts; use random or a longer word count for older pupils, and never use word passwords for staff or anyone with admin access.
Step 3 — Review the preview
The wizard generates and lists every matched member's new password in a table. Nothing is written to any account at this step — it's a preview only, so review it carefully. Not happy with a random batch (or where a template's incrementing count starts)? Select Regenerate for a fresh set — an incrementing pattern always restarts from 1.
Step 4 — Apply
Select Apply and confirm. This is the same irreversible, immediate write as the CSV path — every previewed password is set on its member straight away, and reaches your connected platforms on the schedule described in When the new password reaches your platforms. Once applied, you'll get a Download CSV link to the one-time credentials file (handle it with the same care as any plaintext password list) and a link into the run history described next. That file has three columns — username, password and reg_group — so you can sort it by registration group and hand each tutor only their own class's slips.
Reviewing past wizard runs
Select History at the top of the Password import page to see past wizard runs: when each was applied, the strategy used (random, your template pattern, or e.g. "Random 3 words"), how many members it covered, who ran it, and its status (pending, applied or failed). A completed run shows a Download CSV link to its one-time credentials file while it's still available — handle that file with the same care as any plaintext password list. Files from runs applied before the registration-group column was added have username and password only.
Troubleshooting
- "The header row must be: username, password. This file starts with: …" — the message names the column headings actually found in your file, so compare them with the two expected ones. Capitals, extra spaces, a UTF-8 byte-order mark and semicolon or tab separators are all handled, so if this appears the column names themselves are genuinely different. The quickest fix is to start from Download example CSV.
- "No user rows were found below the header row." — the header is right but there's nothing under it. Usually a file saved with only its headings, or one saved in an old Mac-only CSV format; re-save it from your spreadsheet as CSV or CSV UTF-8 and upload again.
- A username shows as not matching — check for typos, extra whitespace, or that the user exists in this school (password import doesn't search other schools).
- I uploaded the wrong file — nothing is written until you select Start import; you can upload a different file first.
- The wizard's preview shows "No members match these filters" — go back to Step 1 and widen the user type, year group or group selection, or tick Include suspended and inactive members.
- An error appears under the pattern field — the template must contain exactly one of
{random_5_digits}or{incrementing_5_digits}, and no other{…}text. Fix the pattern and the example/error updates immediately. - I want a specific word in every password — that's the Use a pattern strategy, not Random words: the words are drawn from a fixed list and can't be chosen or added to.
Related
Was this guide helpful?
We read every response — it decides what we rewrite next.
Thanks for your feedback.