Bulk actions on groups
The Groups page has its own bulk-action bar — separate from (and larger than) the Add to group action on the Users page. Use this when you want to act on the groups themselves: change their status or settings, merge members between groups, update their Google group or Classroom configuration, or delete them.
This action bar is the same in both per-school Groups and MAT overview → Groups — in MAT mode you can select groups from more than one school at once, and each action is applied and audited per school automatically.
Before you start
- You must be an admin. Mentors and other staff cannot bulk-edit groups.
- Some actions (Google group settings, Classroom state) only make sense for groups linked to Google Workspace / Google Classroom — applying them to a group with no Classroom link simply has no effect for that group.
Steps
Step 1: Open the Groups page
Select Groups in the left sidebar (or Groups under MAT overview for the cross-school version).
Step 2: Select groups
Tick the checkbox at the left of each row, or tick the header checkbox to select all groups matching the current filters. A banner offers to select just the current page or every matching group.
Step 3: Choose an action
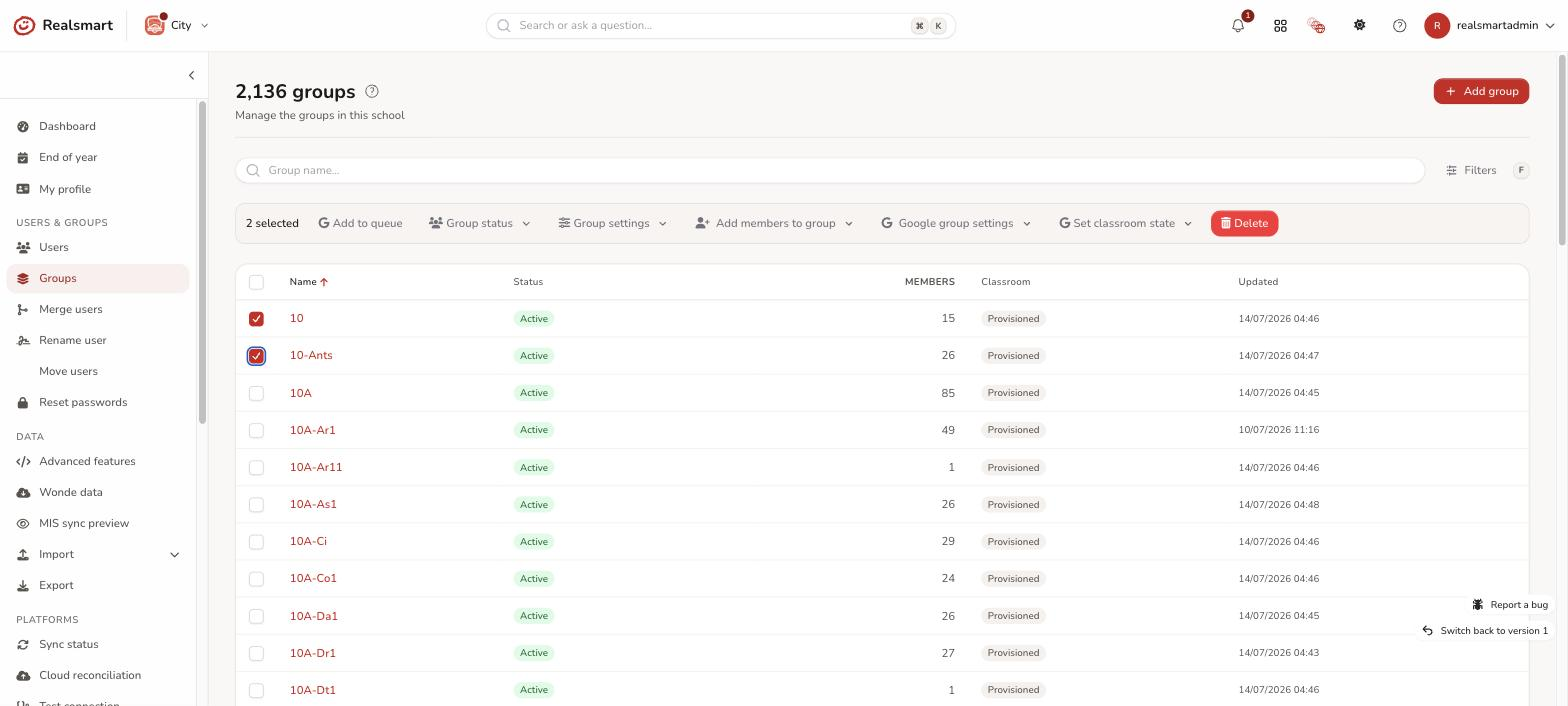
An action bar appears at the bottom of the page showing how many groups are selected. Action menus are grouped by category:
Add to queue Adds the selected groups to the sync queue.
Group status
- Active — normal working group
- Protected — preserved even with no members; never removed by sync
- Suspended — exists but is not actively synced (confirmation shown: their platform groups are disabled on the next sync)
Group settings (matches the settings on a single group's edit page)
- Default mentor role — School default, Member, Owner, or Manager. Setting it to Owner shows a confirmation, since Owners can manage the Google group itself.
- Preserve when empty — on or off (whether the group survives having zero members)
Add members to group Opens a panel where you search for a target group. Every member of every group you selected is added to that target group — a quick way to merge several groups' memberships into one (for example, combining split teaching sets into a single year-group list). Members already in the target are skipped, not duplicated.
Add members from a group The opposite direction. Search for one source group; everyone in it is added to every group you selected — for example, putting the whole senior leadership group into a set of subject groups in one go. Members already there are skipped.
Add specific people Opens a panel where you search for people by name, username or UPN and tick as many as you need. Everyone you tick is added to every group you selected — use it when a named handful (a new teaching assistant, three cover staff) has to land in a set of groups without you opening each group in turn. People already in a group are skipped, not duplicated, and you can pick up to 100 people in one go. Everyone added this way is locked into the group (exactly as if you had added them on the group's Members tab), so the next sync keeps them there even if the MIS doesn't list them. To add a whole group's worth of people instead, use Add members from a group.
The list is searched on the server as you type and shows the closest 50 matches, so keep typing to narrow it. People you have already ticked stay ticked and stay at the top of the list even when you search for someone else, so you can build the list a few names at a time.
All three of these copy the membership as it stands right now. If the groups should stay in step as people join and leave, put the group inside the other group instead — see Put a group inside another group.
In the two group panels, type in the search box to find the group: the list is searched as you type and shows the closest matches, so you never have to scroll a list of every group in the school. A membership never crosses schools — in MAT overview, any selected group in a different school from the source (or from the people you picked) is skipped, and the result tells you how many.
Google group settings Opens a panel of Google group configuration options (the same options available on a single group's Google settings). Only the options you actually set are applied — anything left blank is skipped.
Set Classroom state Active, Archived, Declined, or Provisioned — sets the Google Classroom course state for every selected group that has a linked Classroom course.
This one talks to Google live, one course at a time, so a large selection takes a while. A progress bar appears above the list showing how far it has got. Keep the page open until it finishes — anything already changed is saved, so if you do close it, running the same selection again picks up the rest.
When it finishes you always get a message saying what happened: how many were changed, and — if any failed (a Google API error, or a group with no Classroom course) — which ones.
Delete Soft-deletes the selected groups. This is destructive and wide-reaching, so it's gated behind extra confirmation — see the next step.
Step 4: Confirm if prompted
Actions that change access or delete data show a confirmation dialog. Delete goes further: you must type to confirm, and the dialog warns that any selected group linked to a Google Classroom will also be affected on the next sync — review the selection carefully before confirming.
Result
The action is applied to every selected group. A success message confirms how many groups were updated; for actions that can partially fail (like Classroom state), the result lists exactly which groups succeeded and which didn't.
Tips
- Use Add members to group to consolidate several smaller groups into one without manually moving each member.
- Use Add members from a group when the same set of people needs to land in many groups at once.
- Use Add specific people when it's a named handful rather than a whole group — it saves opening each group's Members tab one at a time.
- If you find yourself repeating either action to keep groups aligned, nest the group instead — see Put a group inside another group.
- In MAT overview, use the School filter first to narrow down before selecting, especially in large trusts.
Related
Did this work for you?
If a step looked different on your site, tell us and we'll update the screenshots.
Thanks for your feedback.