Smart Theme Options
Overview
smartOptions holds your school website's site-wide settings in one place: your school's details, colours and fonts, the header and menu, the homepage slideshow, how posts show their author and date, tracking codes, how your site appears in search results and when shared, and the roles people get when they sign in through SmartLogin.
The page is split into eight sections, listed down its left-hand side. Several sections show a live preview, so you can see a change before you save it. Changes apply across the whole website once you click Save changes. Only administrators can open smartOptions.
Getting set up
Step 1: Open smartOptions
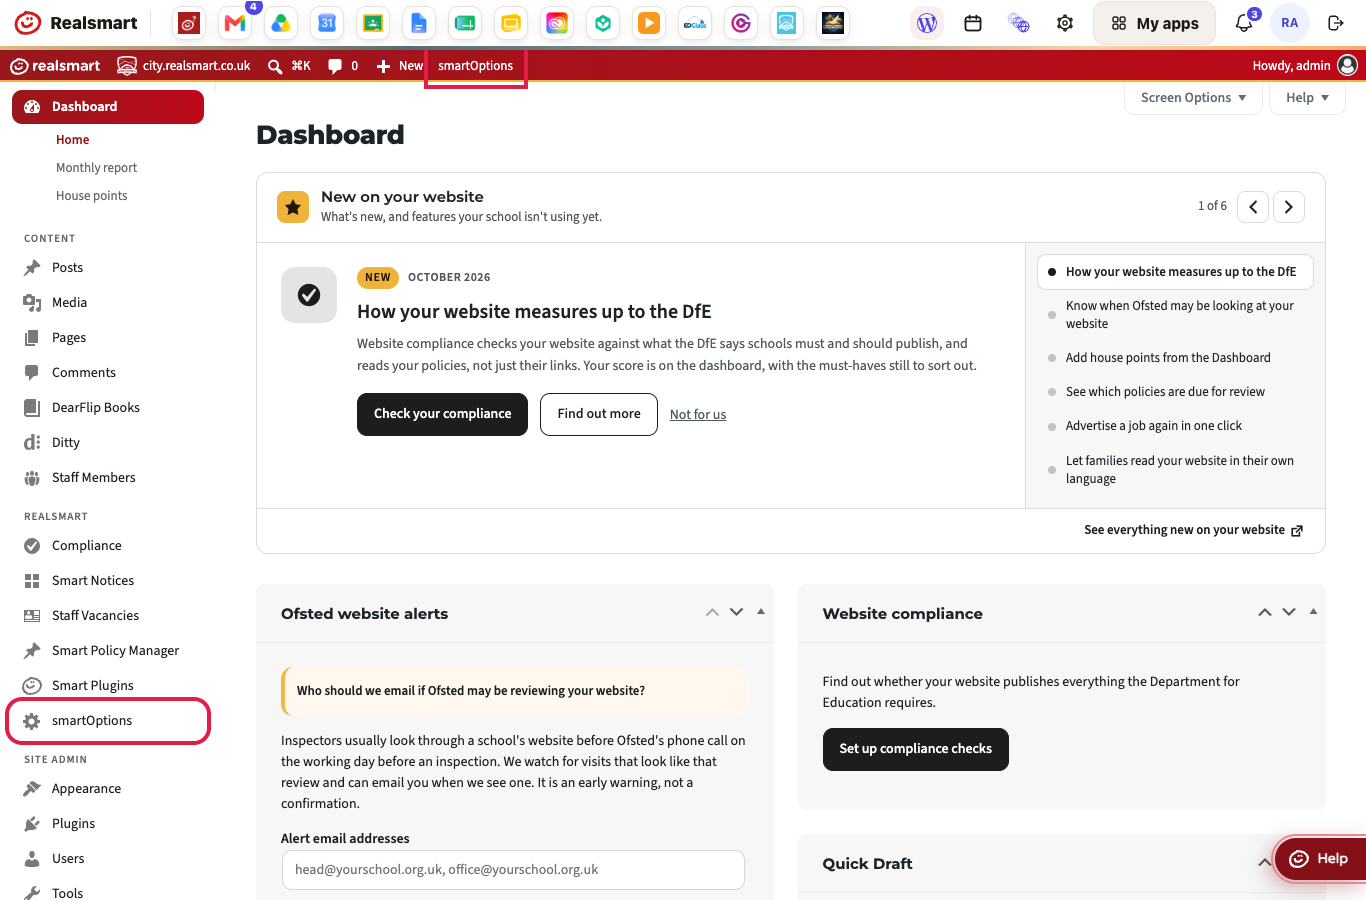
Click smartOptions in the REALSMART group of the left-hand WordPress menu, or smartOptions in the toolbar at the top of any admin page.
Step 2: Fill in your school details
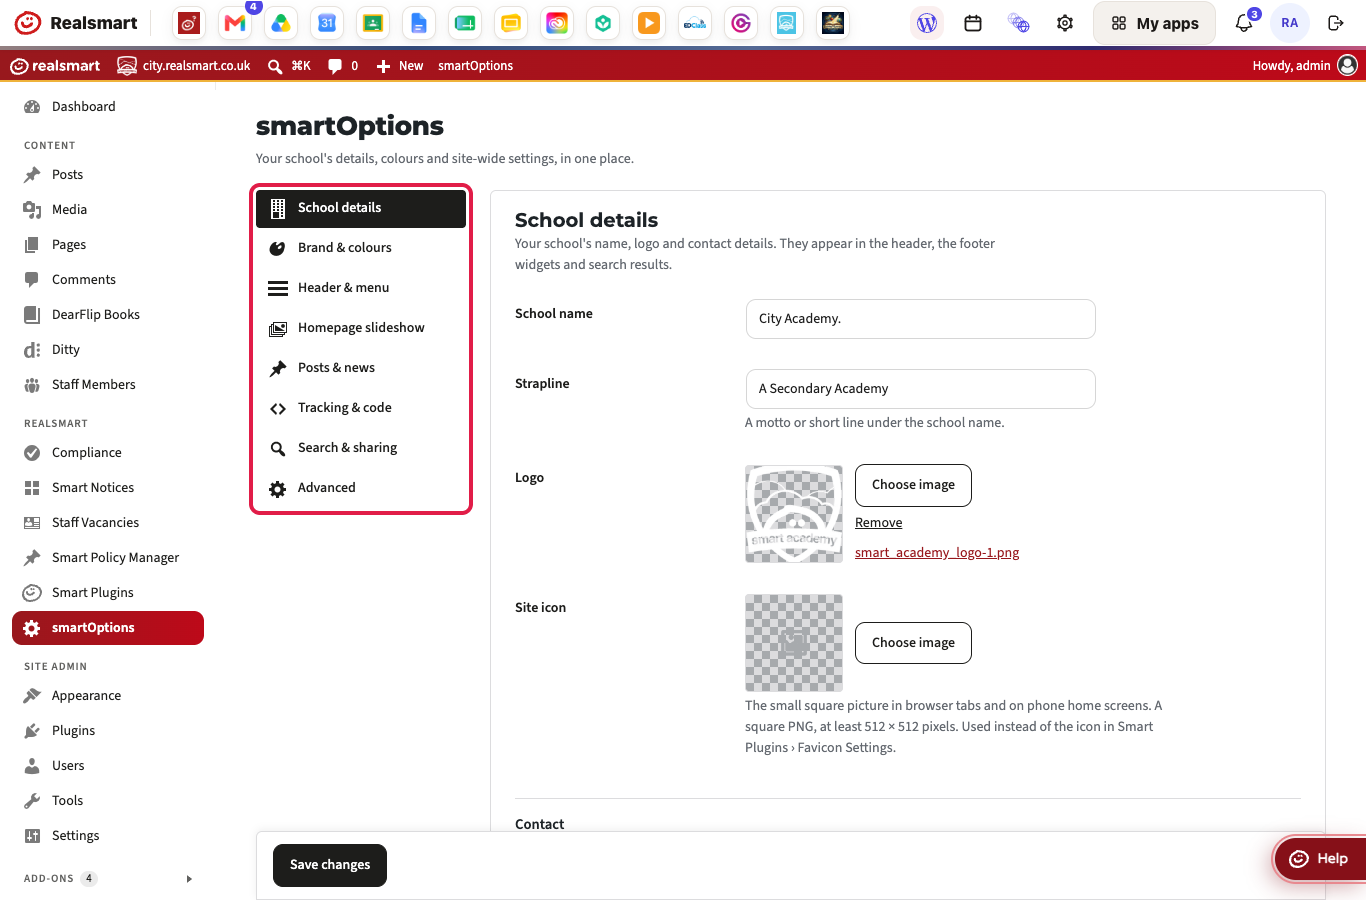
The page opens on School details. The sections are listed on the left: School details, Brand & colours, Header & menu, Homepage slideshow, Posts & news, Tracking & code, Search & sharing and Advanced. Click a section's name to open it.
Enter your School name and Strapline. Click Choose image under Logo to pick your logo from the Media Library. Under Contact, fill in your Address, Telephone, Email and Fax.
Step 3: Set your colours
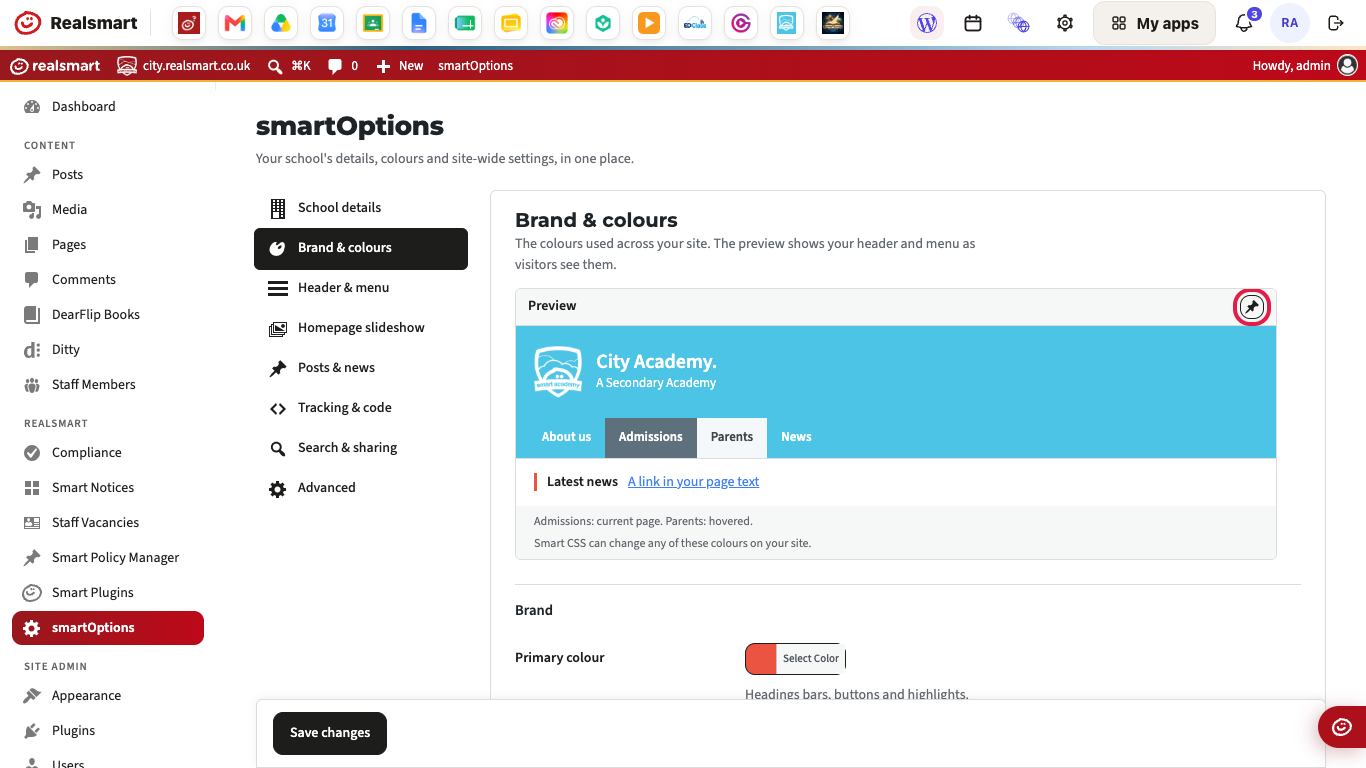
Click Brand & colours. Click Select Color beside Primary colour, Secondary colour and Links to choose your colours. The Preview at the top shows your header and menu with the new colours straight away. Click the pin icon at its top right to keep the preview on screen while you change colours further down the page.
Step 4: Choose what your header shows
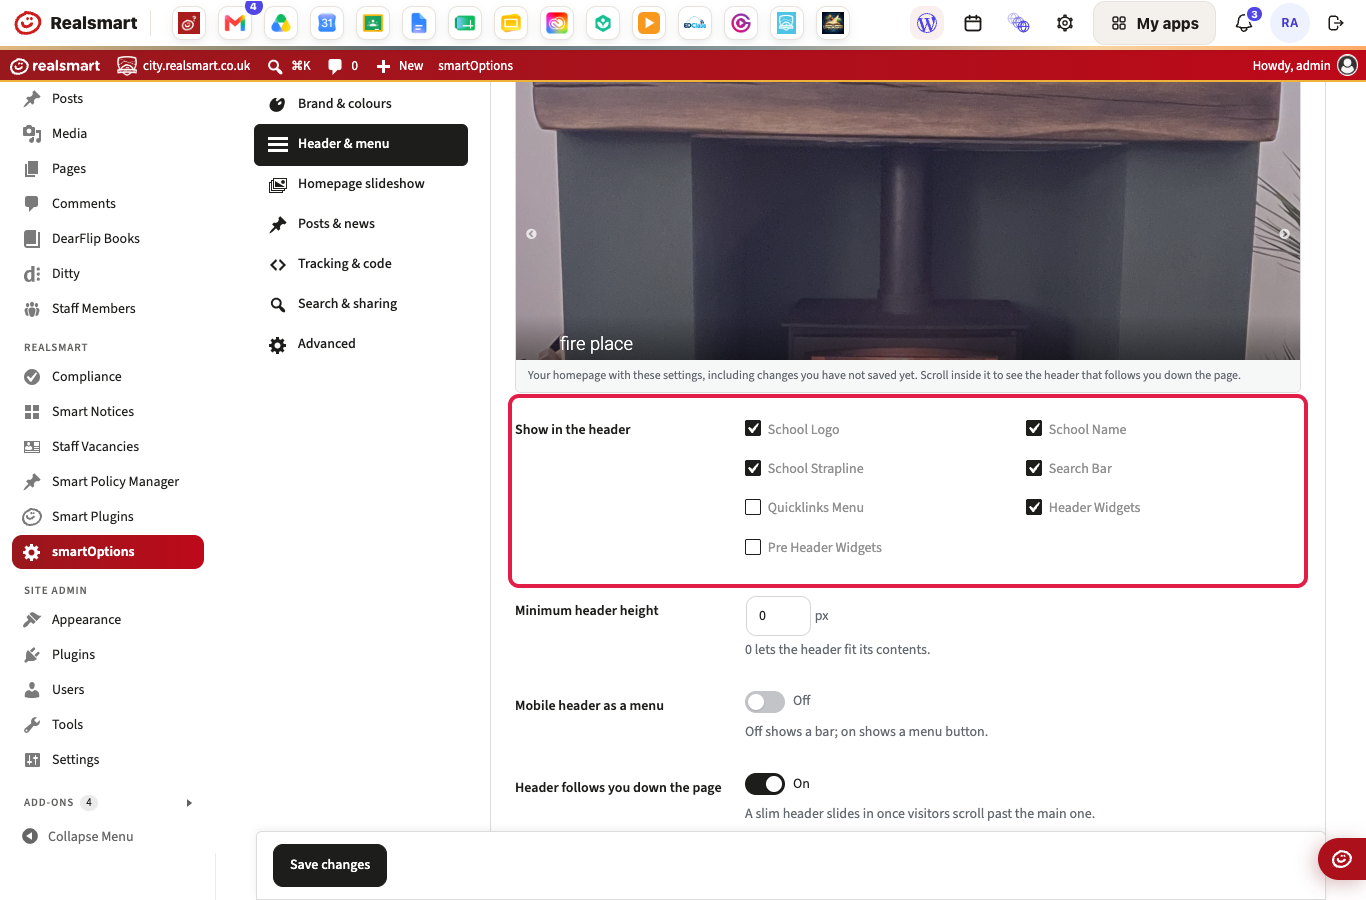
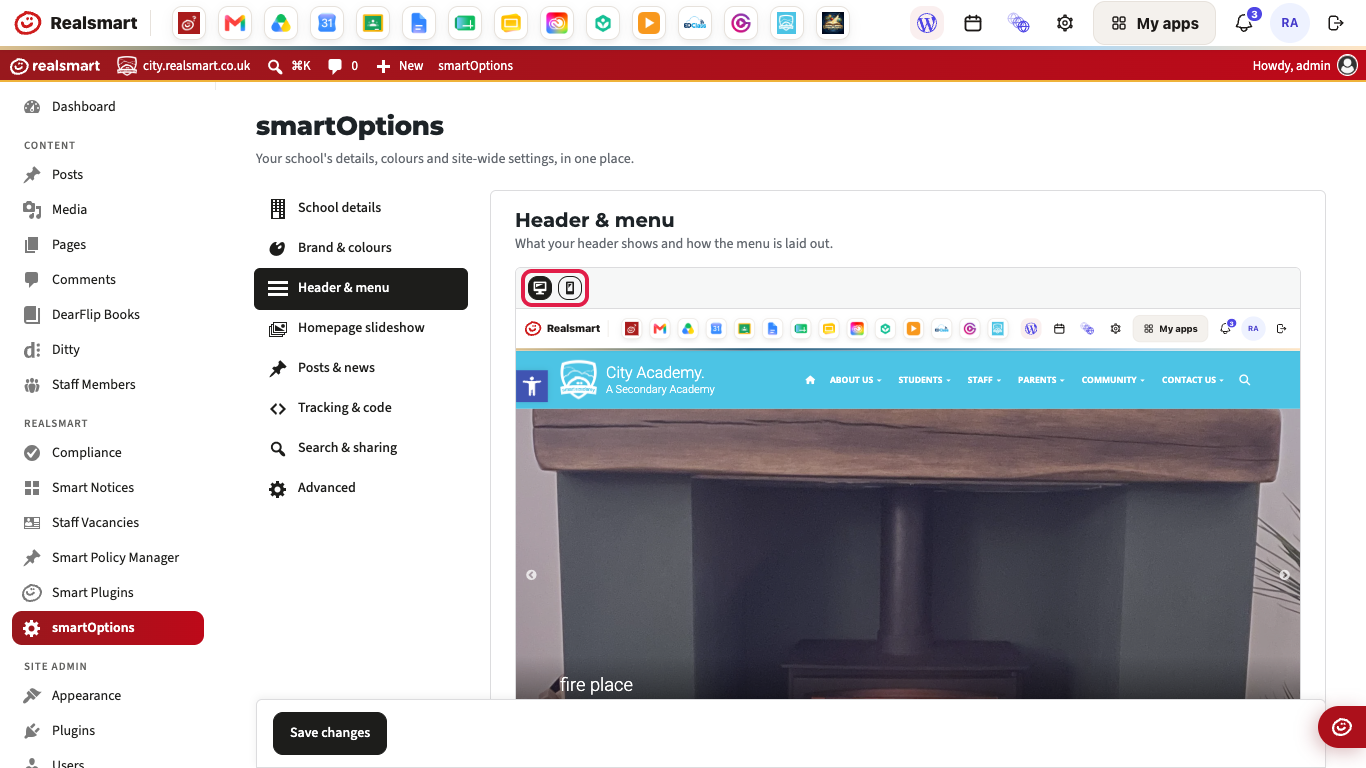
Click Header & menu. A preview of your real homepage, with your unsaved changes, is at the top. Click the phone icon to see it at phone size. Under Show in the header, tick the parts you want: School Logo, School Name, School Strapline, Search Bar, Quicklinks Menu, Header Widgets and Pre Header Widgets.
Step 5: Save
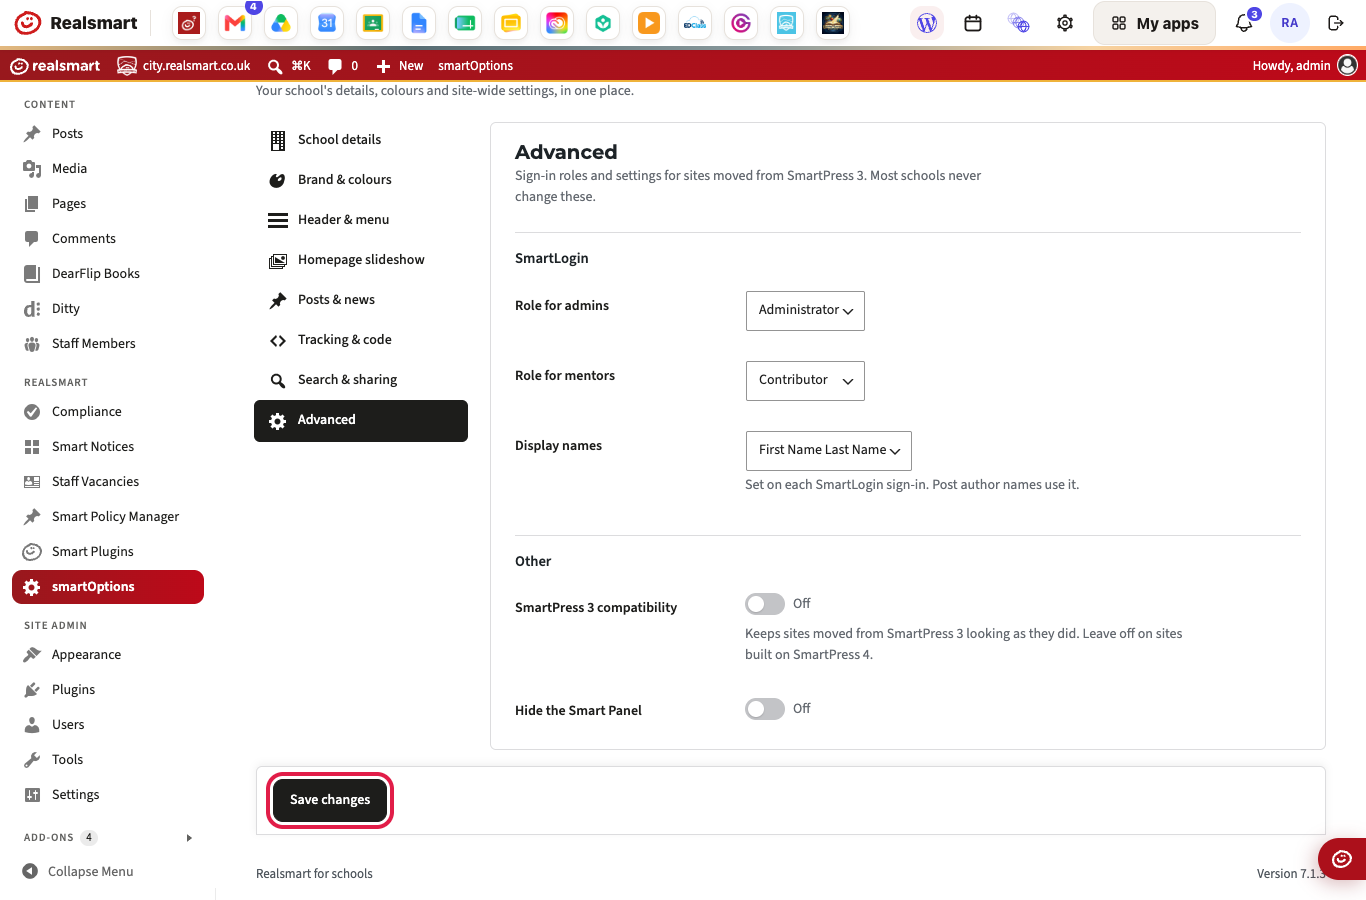
Click Save changes in the bar at the bottom of the page. The bar stays on screen as you scroll. One click saves every section, so you can move between sections before you save. When it has saved, Settings saved. shows at the top of the page.
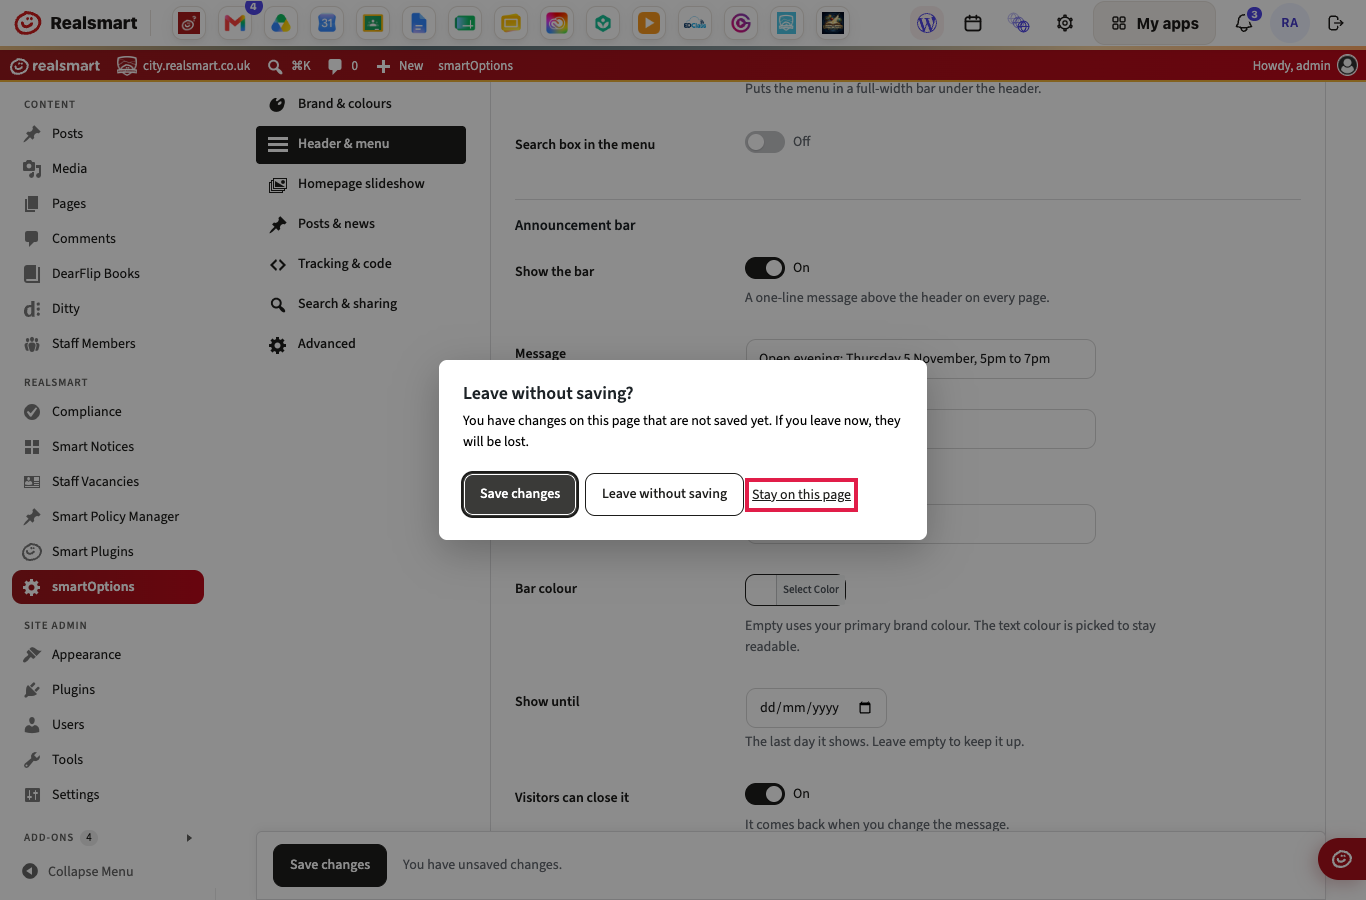
If you click a link that leaves the page before saving, Leave without saving? asks what to do. Click Save changes to save first, Leave without saving to lose your changes, or Stay on this page to go back.
Settings
Defaults are what a brand-new site starts with. Most schools' settings were filled in when their website was set up.
School details
Where to find it: smartOptions → School details
| Setting | What it does | Default |
|---|---|---|
| School name | Your school's name, shown in the header when School Name is ticked under Show in the header. It does not change your WordPress site title (the name in browser tabs and search results) — change that under Settings → General → Site Title | Your WordPress site title |
| Strapline | A motto or short line under the school name, shown when School Strapline is ticked. It does not change your WordPress tagline | Your WordPress tagline |
| Logo | Your logo, shown in the header when School Logo is ticked | None |
| Site icon | The small square picture in browser tabs and on phone home screens. Use a square PNG, at least 512 × 512 pixels. When set, it is used instead of the icon in Smart Plugins → Favicon Settings | None |
| Address | Your address, one line per box. Click Add a line for another line, or Remove beside a line | Address Line 1, City, County, Postcode |
| Telephone | Your phone number | 0111 111 1111 |
| Your contact email address | [email protected] | |
| Fax | Your fax number | Empty |
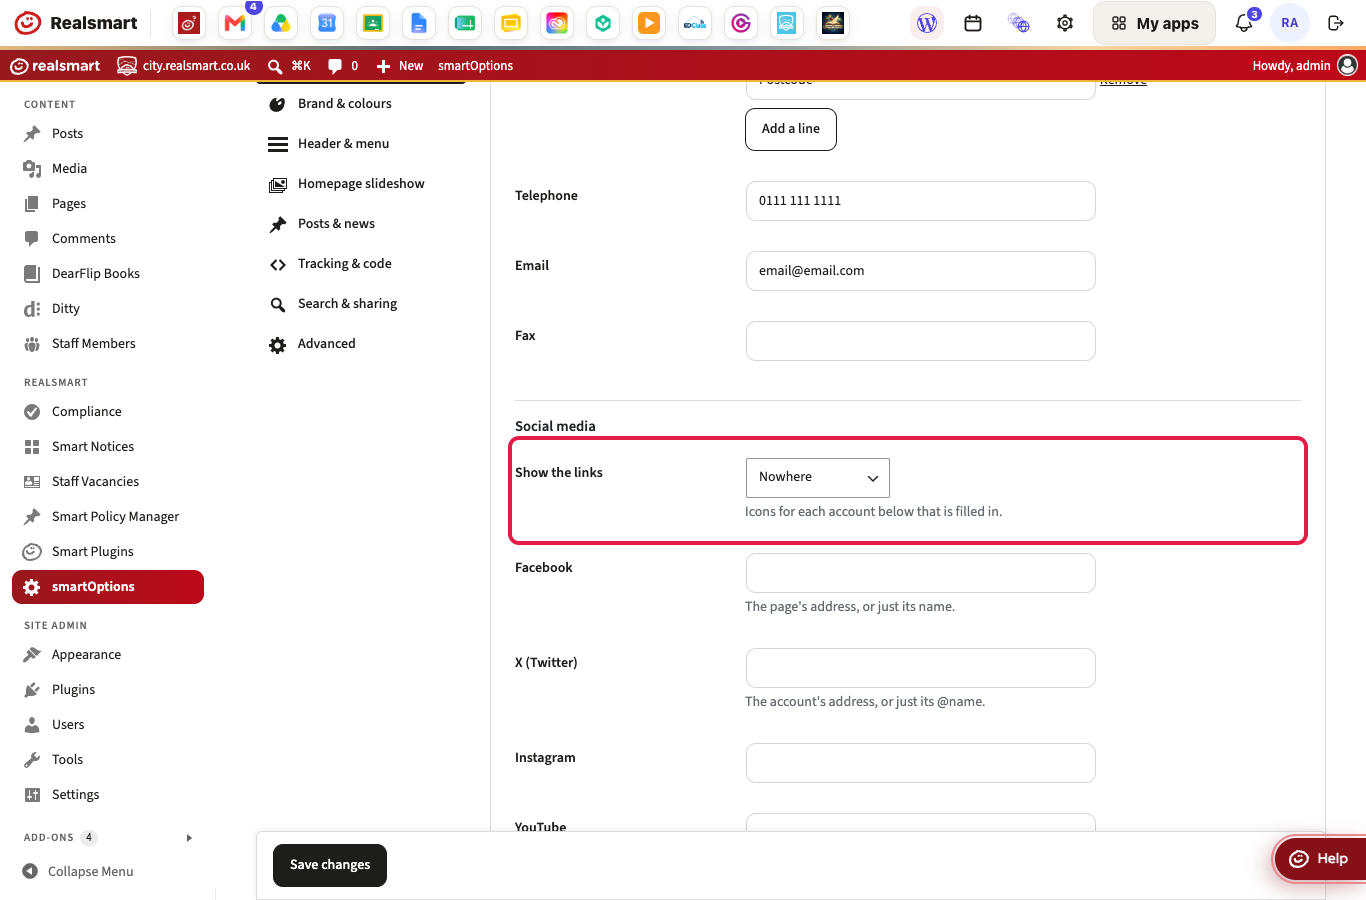
| Show the links | Where icons for your social media accounts appear: Nowhere, In the header, In the footer or Header and footer. An icon shows for each account below that is filled in | Nowhere |
| Facebook, X (Twitter), Instagram, YouTube, LinkedIn | Your accounts. Paste the page's address, or just its name or @handle (LinkedIn needs the full address) | Empty |
The Address and Contact Info widgets (under Appearance → Widgets) show these details wherever you place them.
Brand & colours
Where to find it: smartOptions → Brand & colours
The Preview shows your header and menu as visitors see them, and changes as you pick colours. In it, Admissions shows the current-page colours and Parents the hovered colours. Smart CSS can still change any of these colours on your site.
| Setting | What it does | Default |
|---|---|---|
| Primary colour | Your main brand colour: heading bars, buttons and highlights | #EA5440 |
| Secondary colour | Your second brand colour | #414449 |
| Links | The colour of links across the website | #3f80f8 |
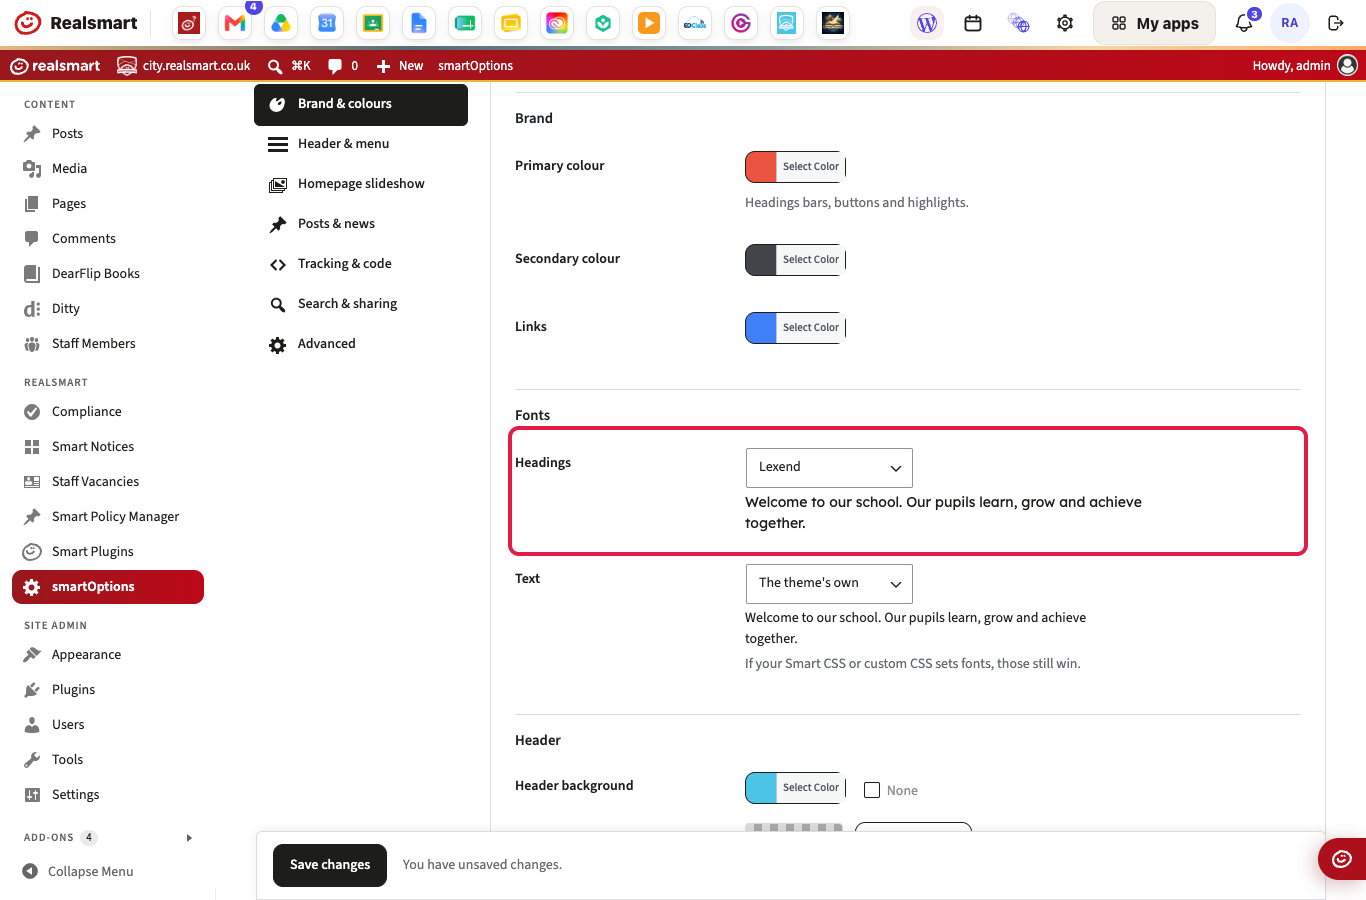
| Headings, Text | The font for headings and for body text. Choose The theme's own or one of 12 fonts; a sample line is drawn in the chosen font. If your Smart CSS or custom CSS sets fonts, those still win | The theme's own |
| Header background | A colour and/or image behind the header | White |
| School name, Strapline | Colour of the school name and strapline in the header | #414449, #5d707c |
| Menu text | Text colour of the main menu | #5d707c |
| Hovered item, Hovered item text | Background and text colour of a menu item when the mouse is over it | #f5f8fb, #414449 |
| Current page item, Current page item text | Background and text colour of the menu item for the page being viewed (only when that page is in your menu) | #5d707c, #fff |
| Menu bar | Background of the menu bar. Used when Menu in its own bar is on (Header & menu) | #fff |
| Mobile menu button | Colour of the menu button on phones | #000 |
| Page background, Content background, Footer background | A colour and/or image for the website background, the content area and the footer | White |
| Banner colour | The strip behind page titles when a page has no featured image | #f1f4f7 |
| Banner image | Used instead of the banner colour when set | None |
Colours that allow it have a None tick box, for no colour at all. A background image has Repeat, Size, Position and Scrolling choices.
Header & menu
Where to find it: smartOptions → Header & menu
The preview at the top is your real homepage with your unsaved settings. Click the desktop or phone icon to change its size. Scroll inside it to see the header that follows you down the page.
| Setting | What it does | Default |
|---|---|---|
| Show in the header | Which parts appear in the header: School Logo, School Name, School Strapline, Search Bar, Quicklinks Menu, Header Widgets, Pre Header Widgets | Logo, name, strapline and search bar ticked |
| Minimum header height | The smallest height of the header, in pixels. 0 lets the header fit its contents | 0 |
| Mobile header as a menu | Off shows a bar on phones; on shows a menu button | Off |
| Header follows you down the page | A slim header slides in once visitors scroll past the main one | On |
| Menu in its own bar | Puts the menu in a full-width bar under the header | Off |
| Search box in the menu | Adds a search box to the menu | Off |
Pre Header Widgets and Header Widgets only show something once you have added widgets to those areas under Appearance → Widgets.
Announcement bar
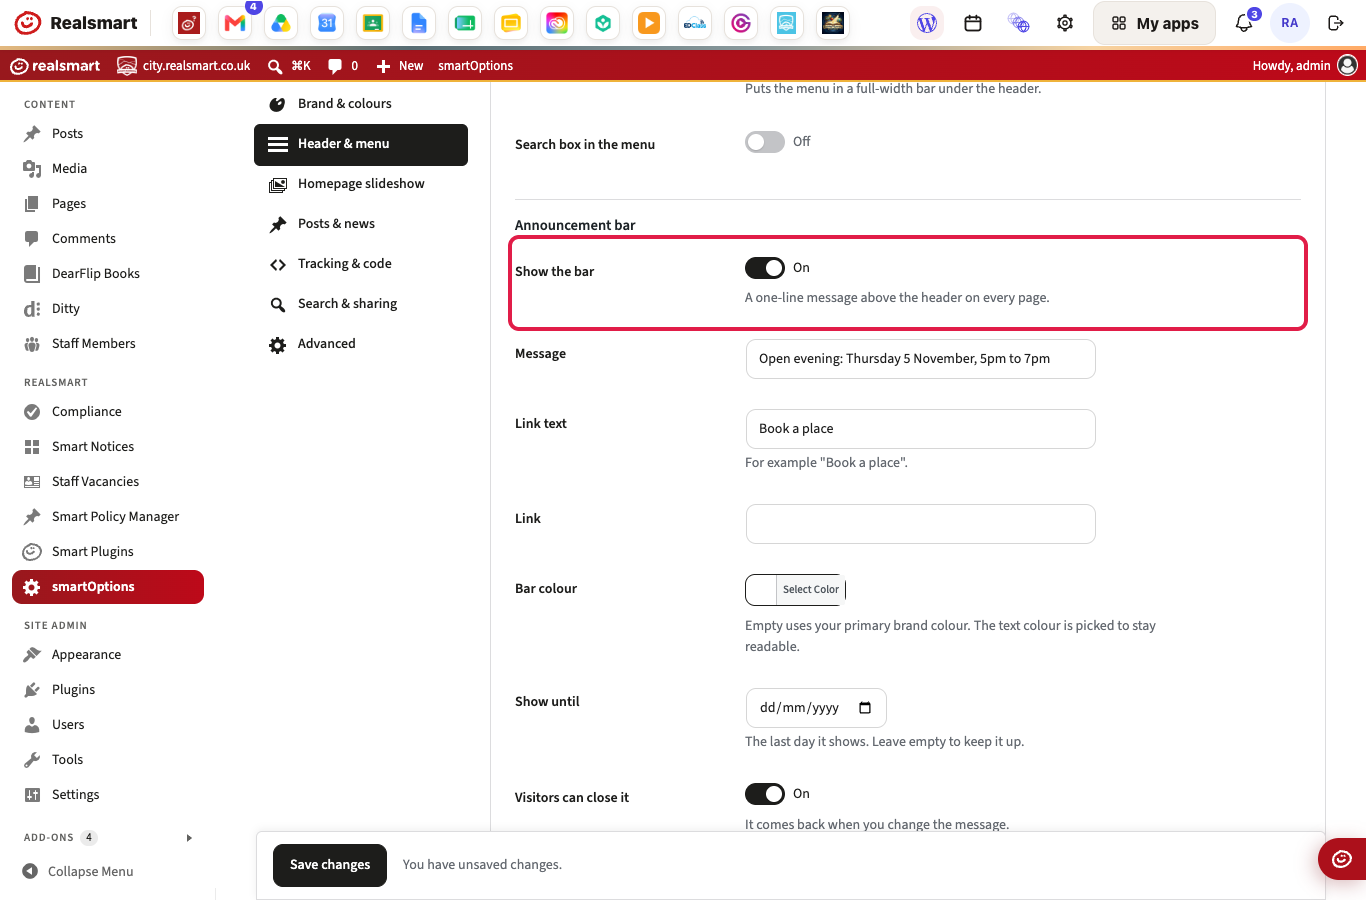
A one-line message above the header on every page, for example an open evening. Turn Show the bar on and the other settings appear.
| Setting | What it does | Default |
|---|---|---|
| Show the bar | Turns the announcement bar on | Off |
| Message | The text of the bar | Empty |
| Link text, Link | An optional link at the end of the message, for example "Book a place" | Empty |
| Bar colour | The bar's colour. Empty uses your primary brand colour. The text colour is picked to stay readable | Empty |
| Show until | The last day the bar shows. Leave it empty to keep it up | Empty |
| Visitors can close it | Lets visitors close the bar. It comes back when you change the message | On |
For an urgent message such as a closure, see also Smart Alert.
Homepage slideshow
Where to find it: smartOptions → Homepage slideshow
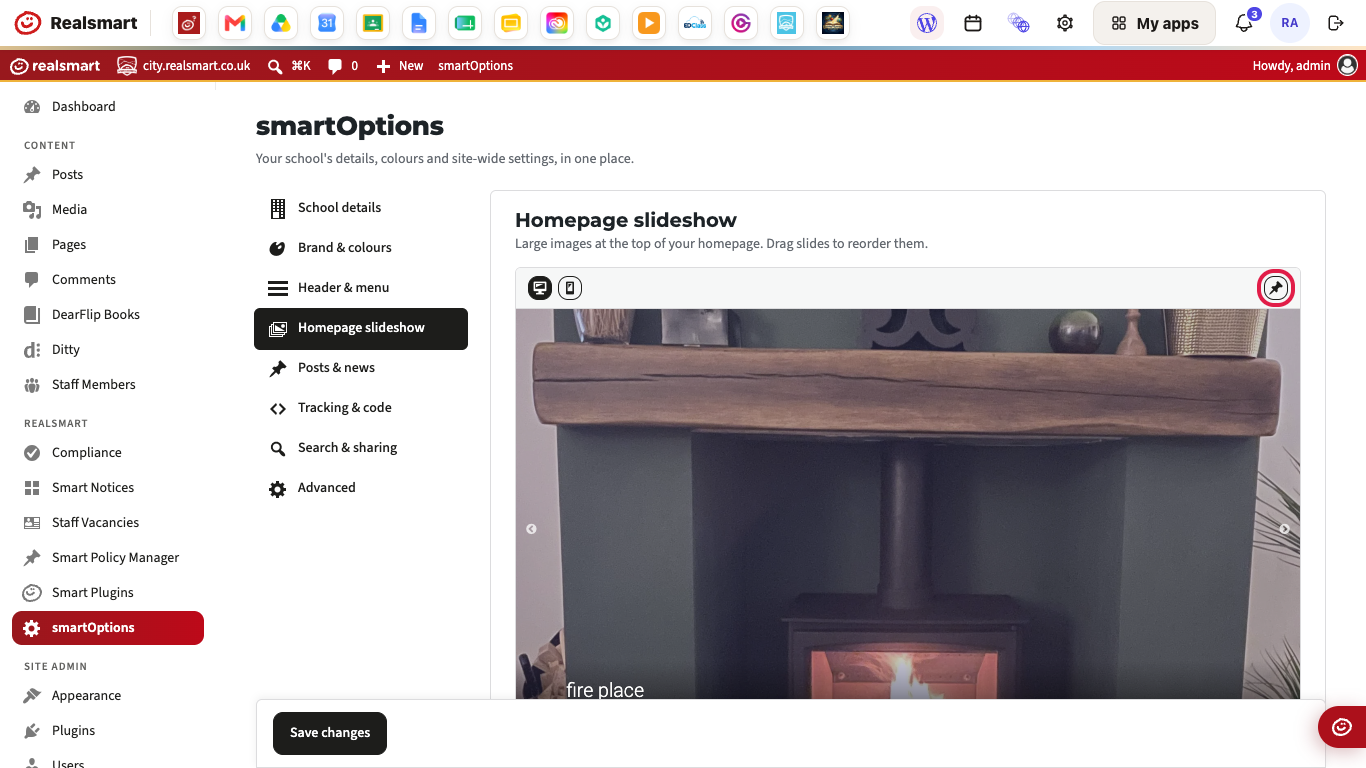
The slideshow appears at the top of your homepage only. The preview shows it as visitors will see it, with your site's styles and your unsaved changes. Click the phone icon to check it at phone size. To watch the preview while you change the settings below, click the pin icon at its top right, which keeps it at the top of the window. Click the pin again to turn that off.
| Setting | What it does | Default |
|---|---|---|
| Show the slideshow | Turns the homepage slideshow on | Off |
| Also show | When logged in: also show it to signed-in users (visitors who are not signed in always see it). On mobile: show it on phones | Both ticked |
| Slides | Your slides. See below | None |
| Fill the screen height | Makes the slideshow fill the visitor's window below the header | Off |
| Height | The tallest the slideshow gets on a computer, in pixels. Hidden while Fill the screen height is on | 460 |
| Play on its own | Moves to the next slide by itself. Off waits for visitors to use the buttons | On |
| Seconds per slide | How long each slide stays | 5 |
| Pause while the mouse is over it | Gives visitors time to read a slide | On |
| Fade between slides | Fades from one slide to the next. Off slides them sideways | Off |
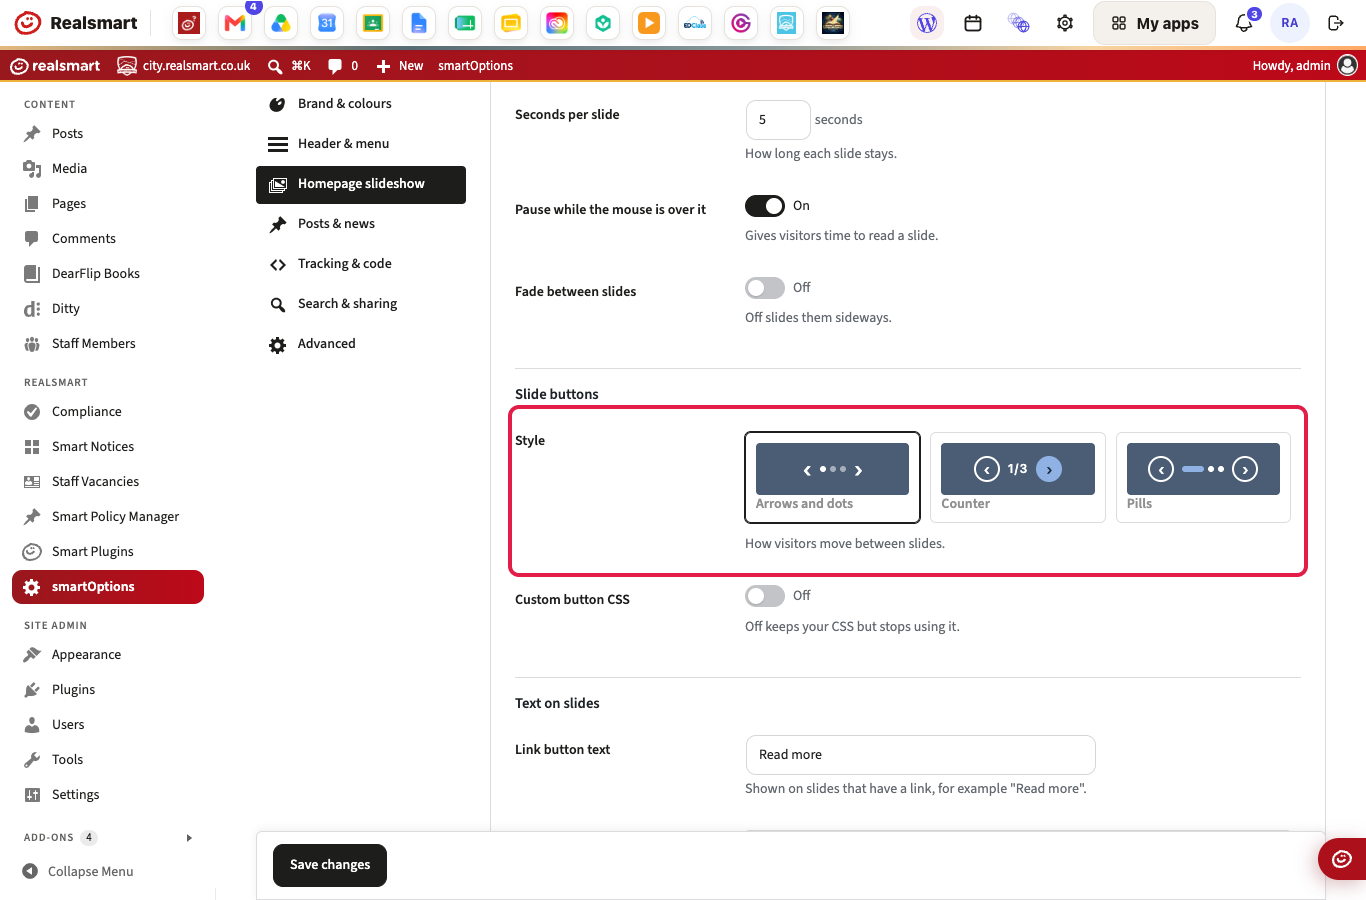
| Style (Slide buttons) | How visitors move between slides: Arrows and dots, Counter or Pills | Arrows and dots |
| Button colour | The filled button and the current-slide pill. Shown for Counter and Pills | #8FB1E4 |
| Custom button CSS, Button CSS | Your own CSS for the slide buttons, loaded only with the slideshow. Insert an example adds the class names for the chosen style. Off keeps your CSS but stops using it | Off |
| Link button text | The text on the button of slides that have a link | Read more |
| Overlay HTML | HTML that sits over every slide. While it has content, it replaces the captions and each slide's own HTML | Empty |
Slides
Each slide is a numbered row with its picture and title; the number is its place in the slideshow. The count beside Slides says how many there are — click Slides to fold the whole list away. Drag a slide by its ☰ handle to move it. Click Add a slide for a new one.
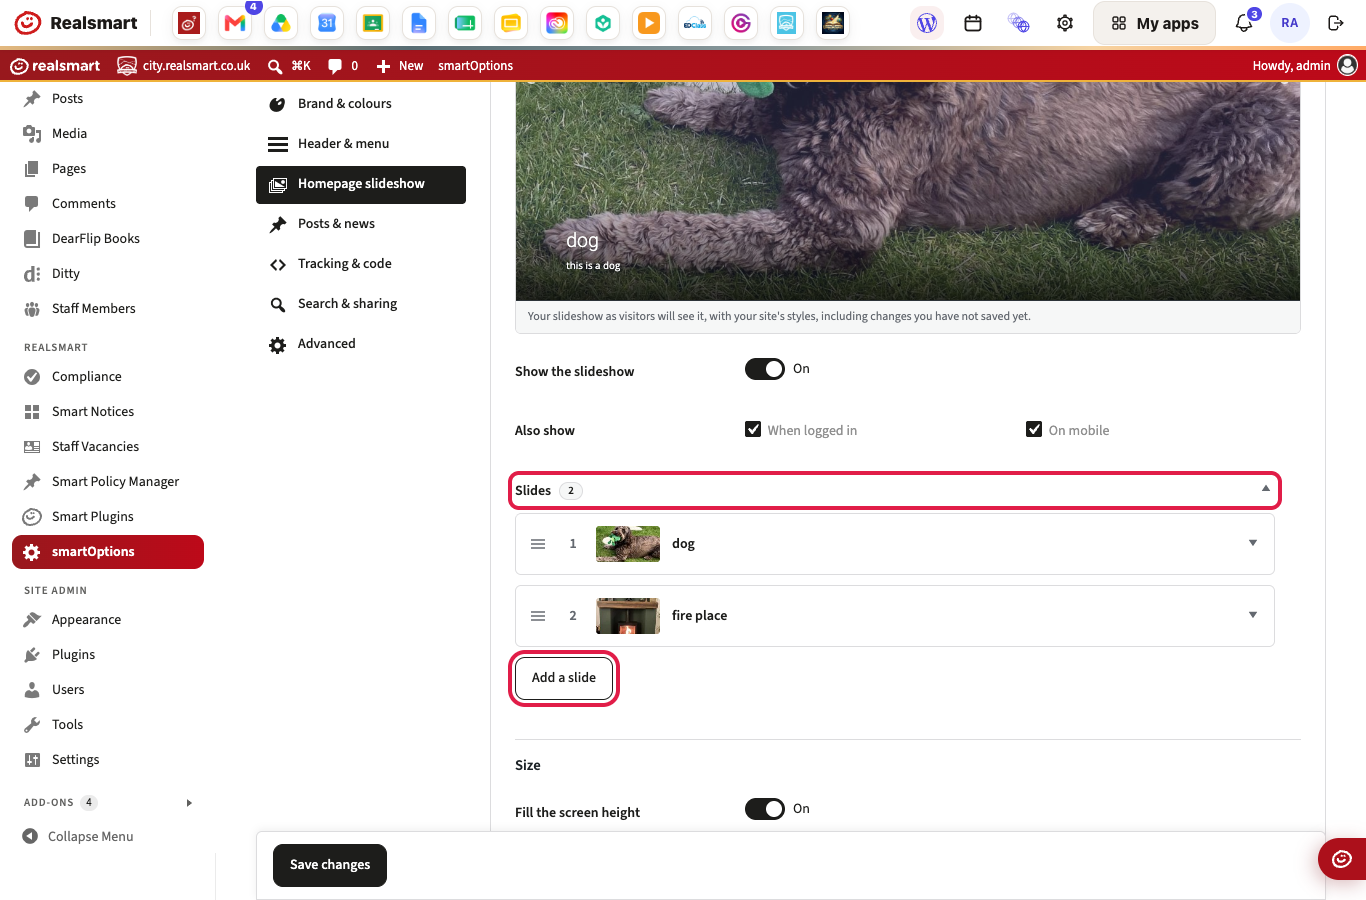
Click a slide's row to open it. There you can:
- click Choose image to pick its picture, or Remove slide to delete it;
- fill in its Title, Caption and Link;
- turn on Custom HTML instead of the caption to show your own HTML over the picture. Check it with the phone icon in the preview: fixed sizes that fit a computer screen can overflow a phone.
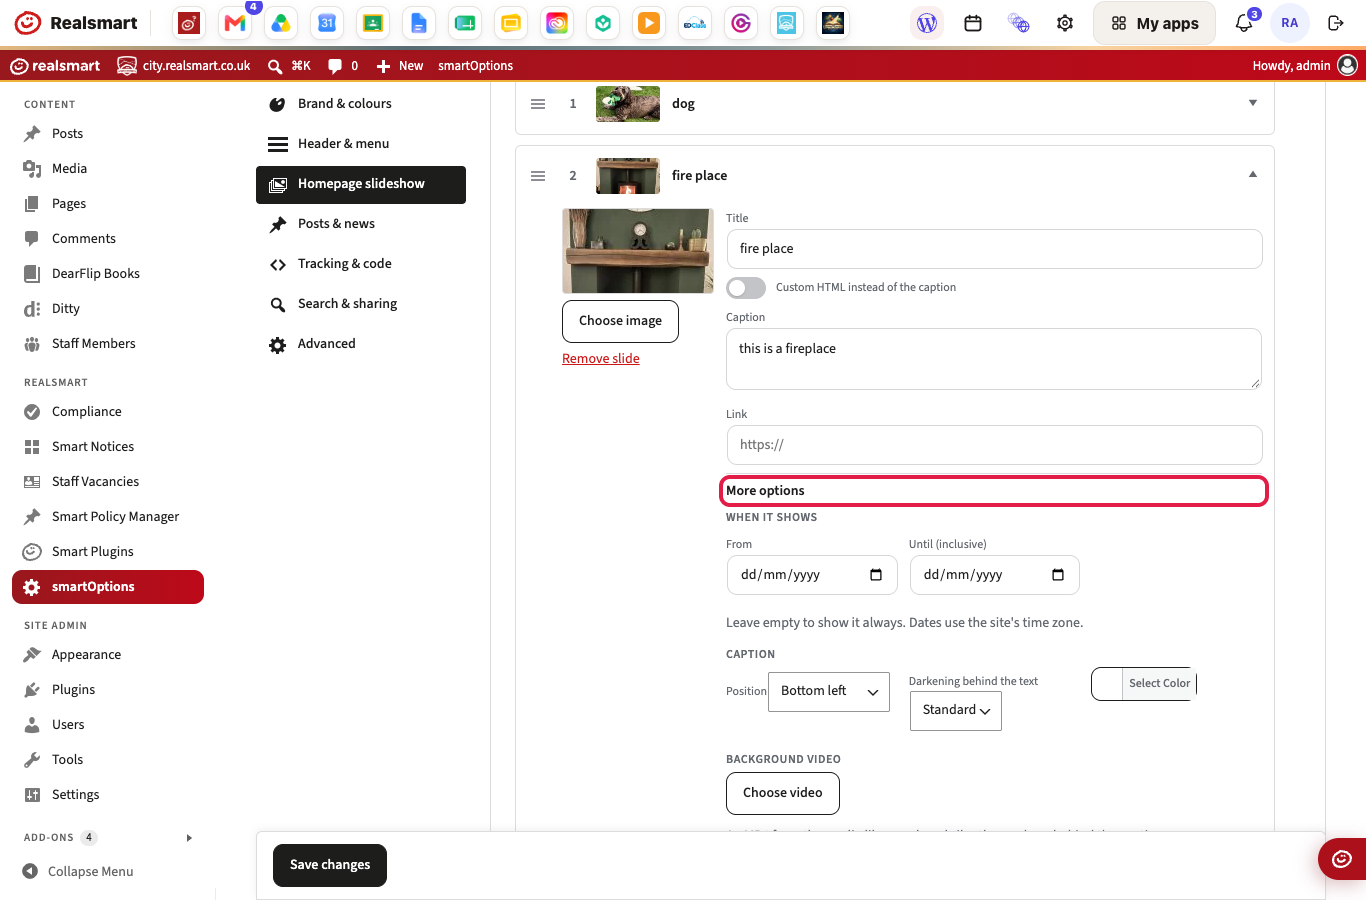
Click More options for:
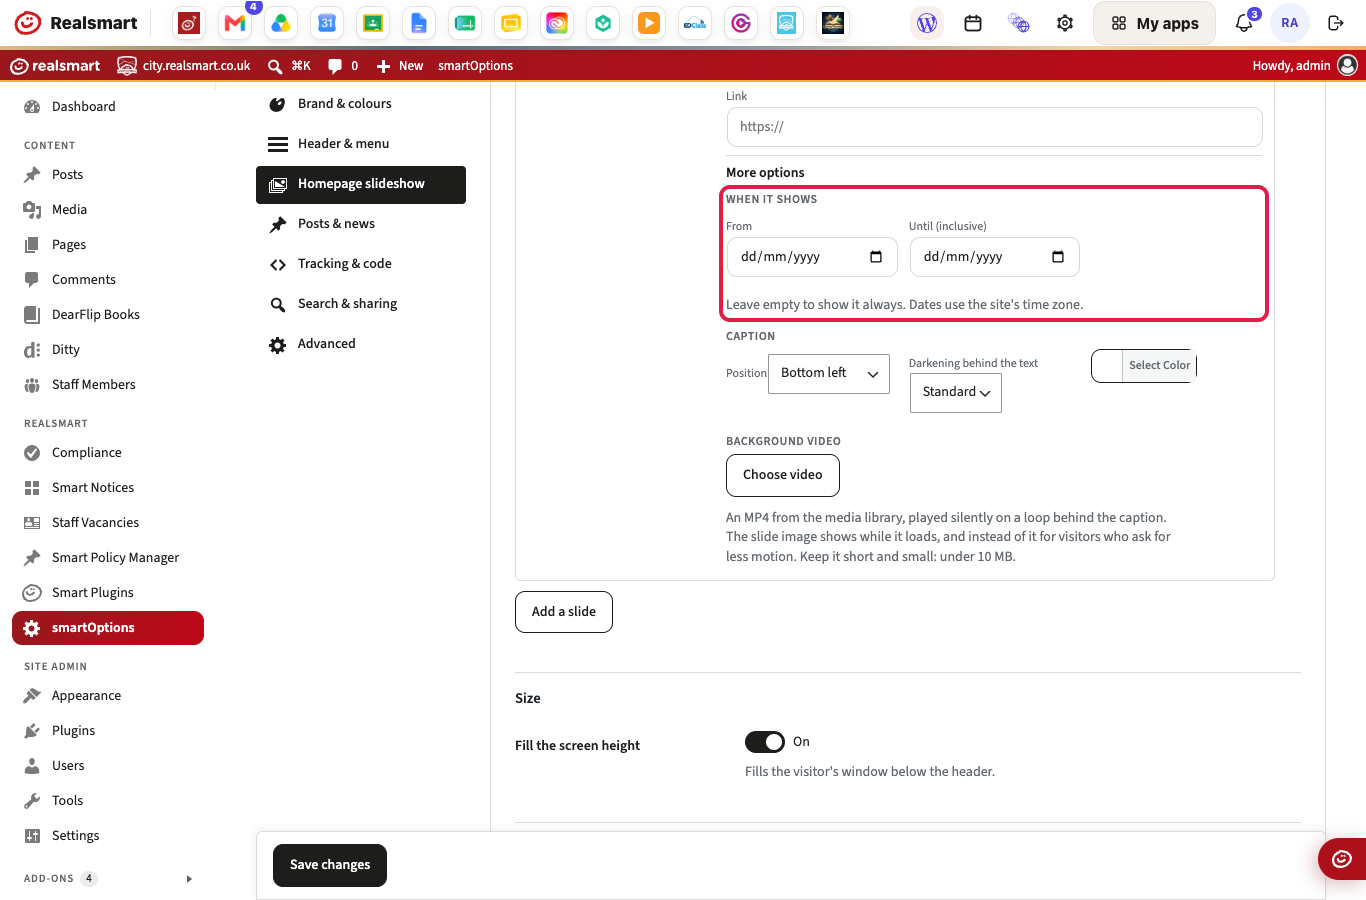
- When it shows — From and Until (inclusive) dates, to show a slide only between two dates. Leave them empty to show it always. Dates use the site's time zone.
- Caption — its Position (Bottom left, Bottom centre, Middle left, Middle centre or Top left), the Darkening behind the text (Standard, None, Light, Medium or Strong) and a text colour.
- Background video — click Choose video to play an MP4 from the Media Library silently on a loop behind the caption. The slide image shows while it loads, and instead of it for visitors who ask for less motion. Keep it short and small: under 10 MB.
A folded slide's row shows labels for what is set: Scheduled, Not showing today, Video, Caption styled or Custom HTML.
Posts & news
Where to find it: smartOptions → Posts & news
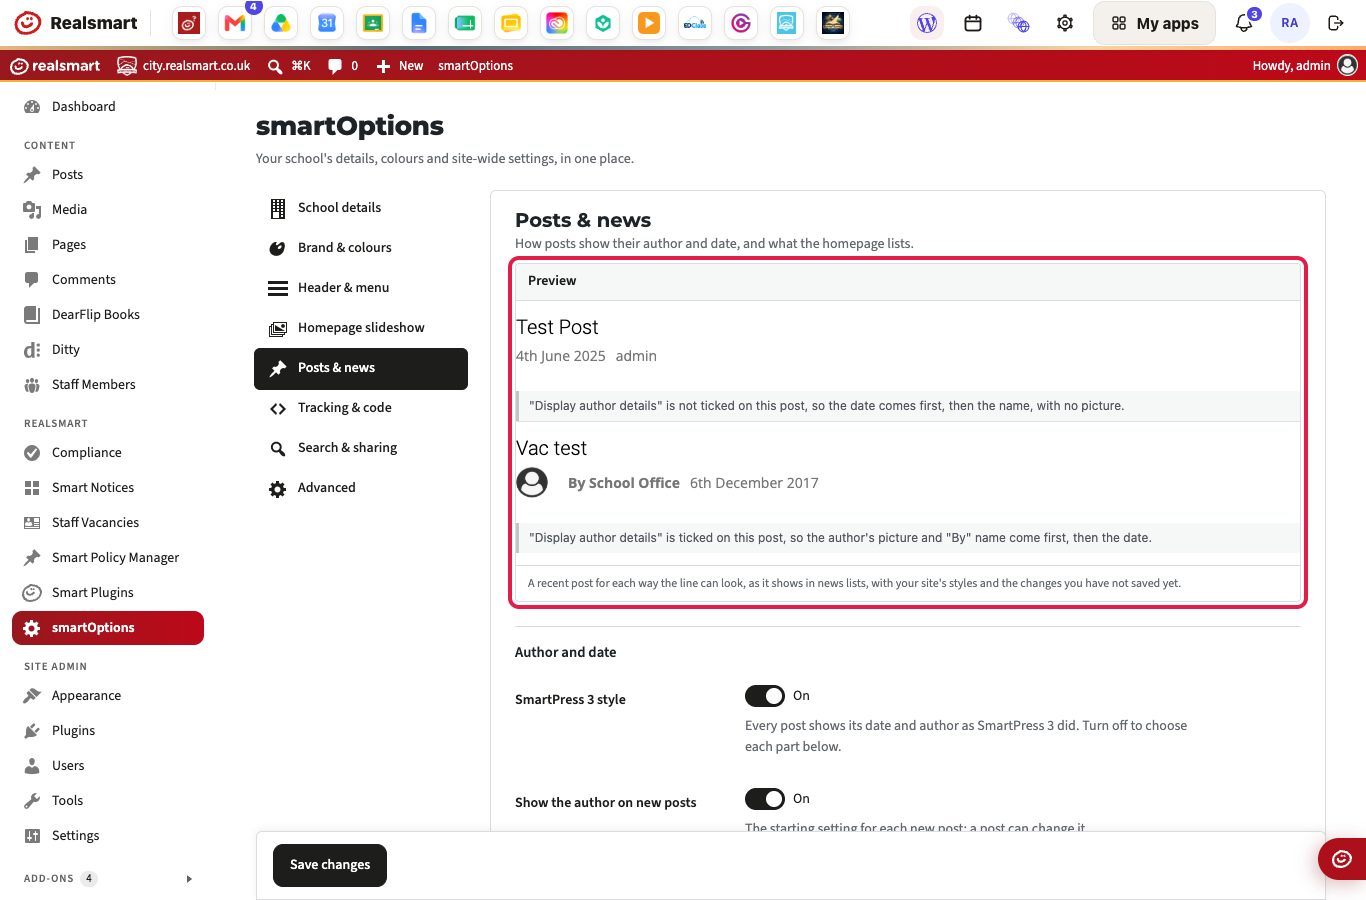
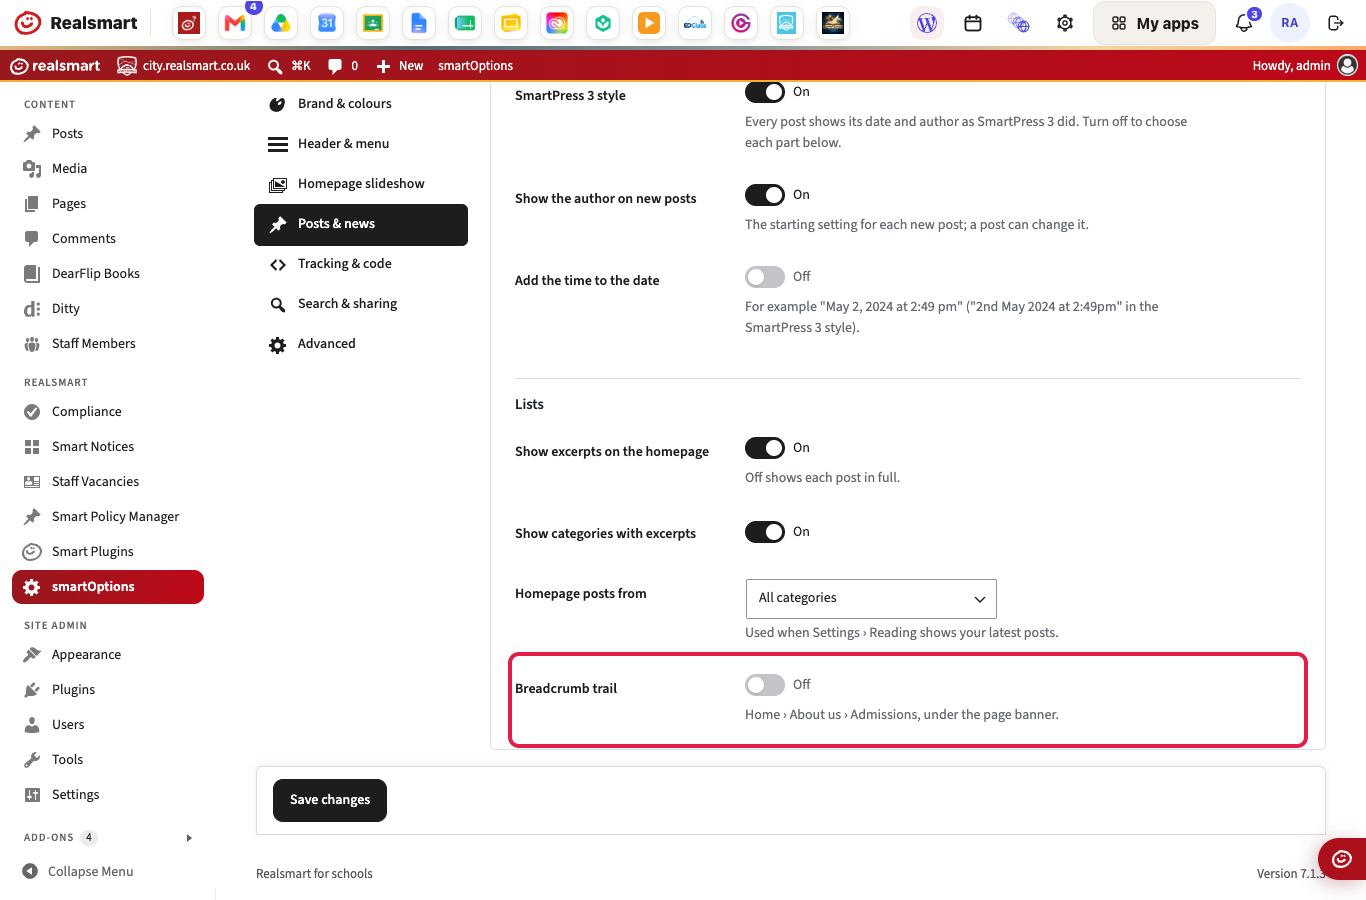
The Preview shows a recent post for each way the author-and-date line can look on your site, as it shows in news lists, with your unsaved changes. A note under each post says why it looks that way — usually whether Display author details is ticked on that post.
| Setting | What it does | Default |
|---|---|---|
| SmartPress 3 style | Every post shows its date and author as SmartPress 3 did. Posts with Display author details ticked also show the author's picture and "By" before the name. Turn it off to choose each part below | On for websites moved from SmartPress 3, Off for others |
| Author names | How authors are named on your website, on every post, old and new: Full name, First initial and surname (J Smith) or Do not show author names. Do not show overrides the Display author details box on each post and also removes author pages. wp-admin always shows full names | Full name |
| Show the author on new posts | The starting setting for each new post's Display author details box. A post can change it | On |
| Show the date | Shows the date on posts, in the date format from Settings → General. Shown when SmartPress 3 style is off | Off |
| Add the time to the date | Adds the time of day to the date | Off |
| Show the author's picture | Shows the author's picture on posts. Shown when SmartPress 3 style is off | On |
| Picture for authors without one | Shows a default picture when the author has not uploaded one. Shown when SmartPress 3 style is off | On |
| Show excerpts on the homepage | Shows a short excerpt of each post. Off shows each post in full | On |
| Show categories with excerpts | Shows each post's categories with its excerpt | On |
| Homepage posts from | Limits the homepage to posts from one category. Only used when Settings → Reading shows your latest posts | All categories |
| Breadcrumb trail | Shows a trail such as Home › About us › Admissions under the page banner. It is built in, so no extra plugin is needed. It does not show on the homepage | Off |
Tracking & code
Where to find it: smartOptions → Tracking & code
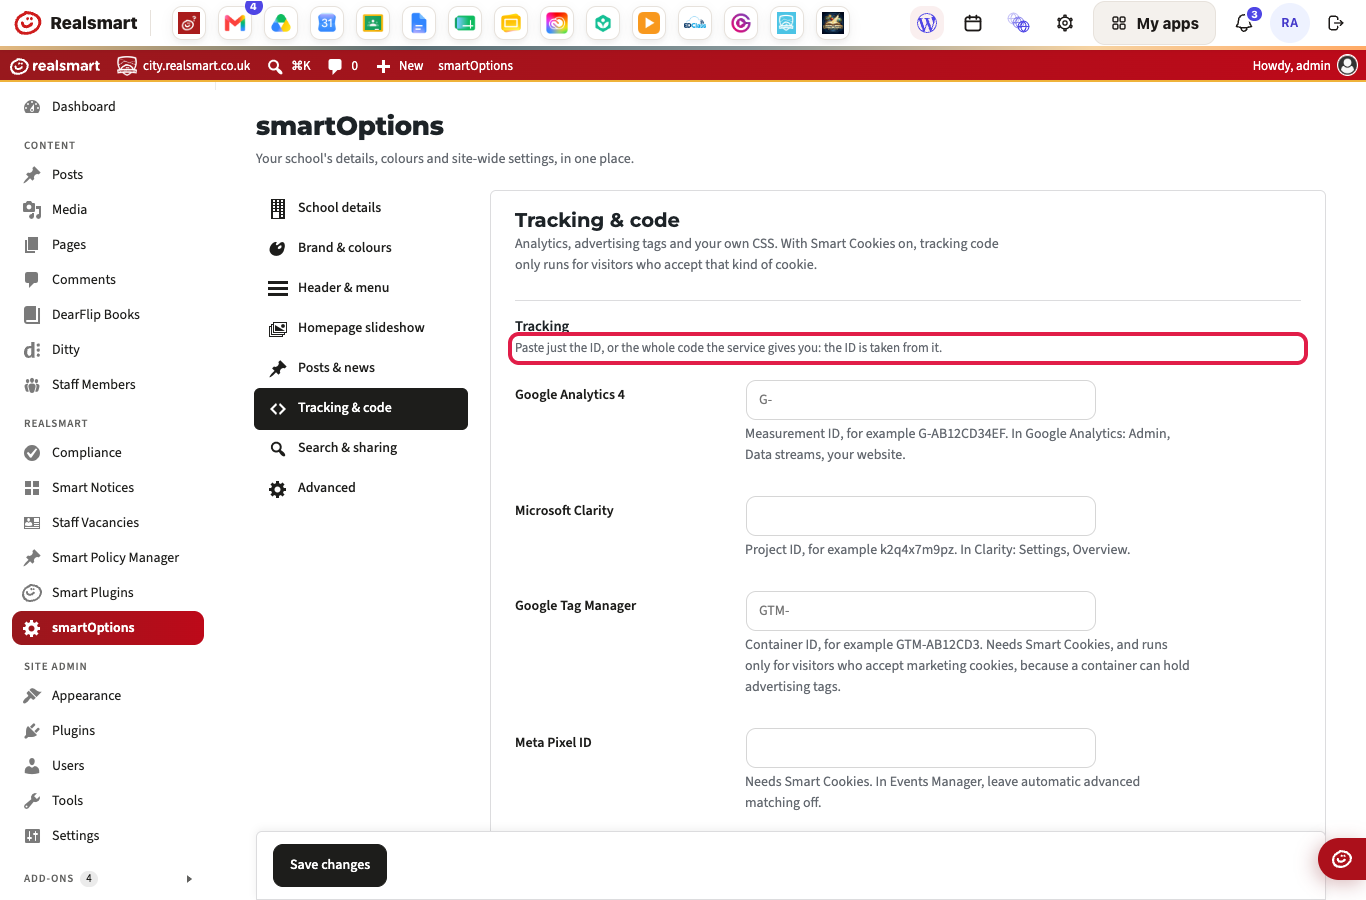
Paste just the ID, or the whole code the service gives you: the ID is taken from it. For Google Analytics 4, Microsoft Clarity and Google Tag Manager, if no ID can be found in what you paste, the box is not changed. With Smart Cookies on, tracking only runs for visitors who accept that kind of cookie.
| Setting | What it does | Default |
|---|---|---|
| Google Analytics 4 | Your Measurement ID, for example G-AB12CD34EF. In Google Analytics: Admin, Data streams, your website. Runs as analytics | Empty |
| Microsoft Clarity | Your Project ID, for example k2q4x7m9pz. In Clarity: Settings, Overview. Runs as analytics | Empty |
| Google Tag Manager | Your Container ID, for example GTM-AB12CD3. Needs Smart Cookies, and runs only for visitors who accept marketing cookies, because a container can hold advertising tags | Empty |
| Meta Pixel ID | The number from Meta Events Manager, for measuring Facebook and Instagram adverts. Paste the number, or Meta's whole code. Needs Smart Cookies. In Events Manager, leave automatic advanced matching off | Empty |
| Analytics code | Code for any analytics tool not listed above. Code for an ID already set above is not loaded twice | Empty |
| Marketing code | Advertising tags. Needs Smart Cookies; without it this is not used | Empty |
| CSS | Extra CSS loaded on every page. Custom CSS can break when the site is updated, and is yours to maintain. For most styling, see Smart CSS | Empty |
Each code box starts folded, with a label saying how many lines it holds or Empty. Click Code editor or CSS editor to open it.
Search & sharing
Where to find it: smartOptions → Search & sharing
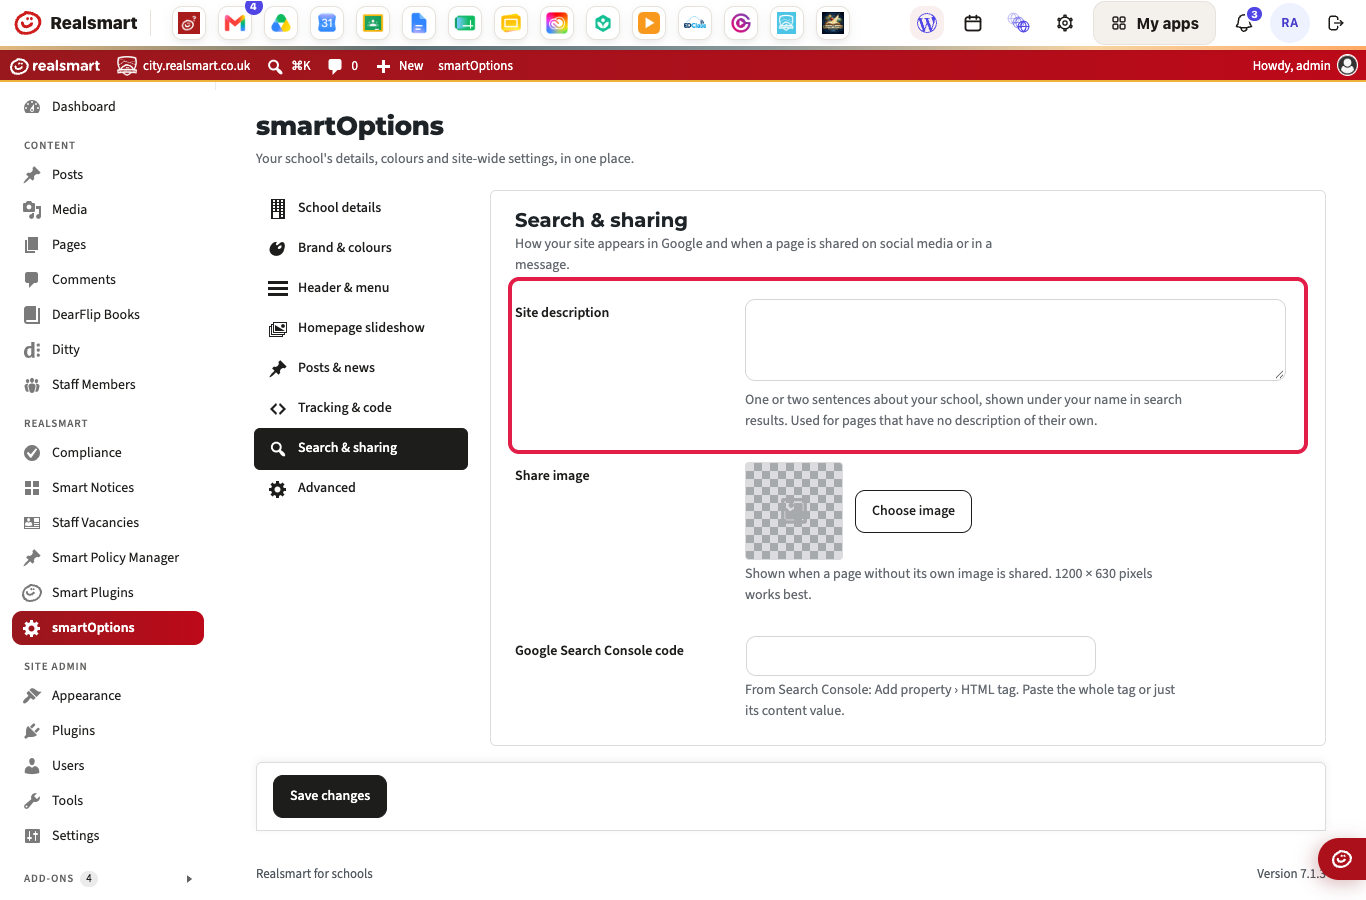
How your site appears in Google, and when a page is shared on social media or in a message.
| Setting | What it does | Default |
|---|---|---|
| Site description | One or two sentences about your school, shown under your name in search results. Used for pages that have no description of their own | Empty |
| Share image | The picture shown when a page without its own image is shared. 1200 × 630 pixels works best | None |
| Google Search Console code | Proves to Google Search Console that the site is yours. In Search Console: Add property › HTML tag. Paste the whole tag or just its content value | Empty |
Advanced
Where to find it: smartOptions → Advanced
Most schools never change these.
| Setting | What it does | Default |
|---|---|---|
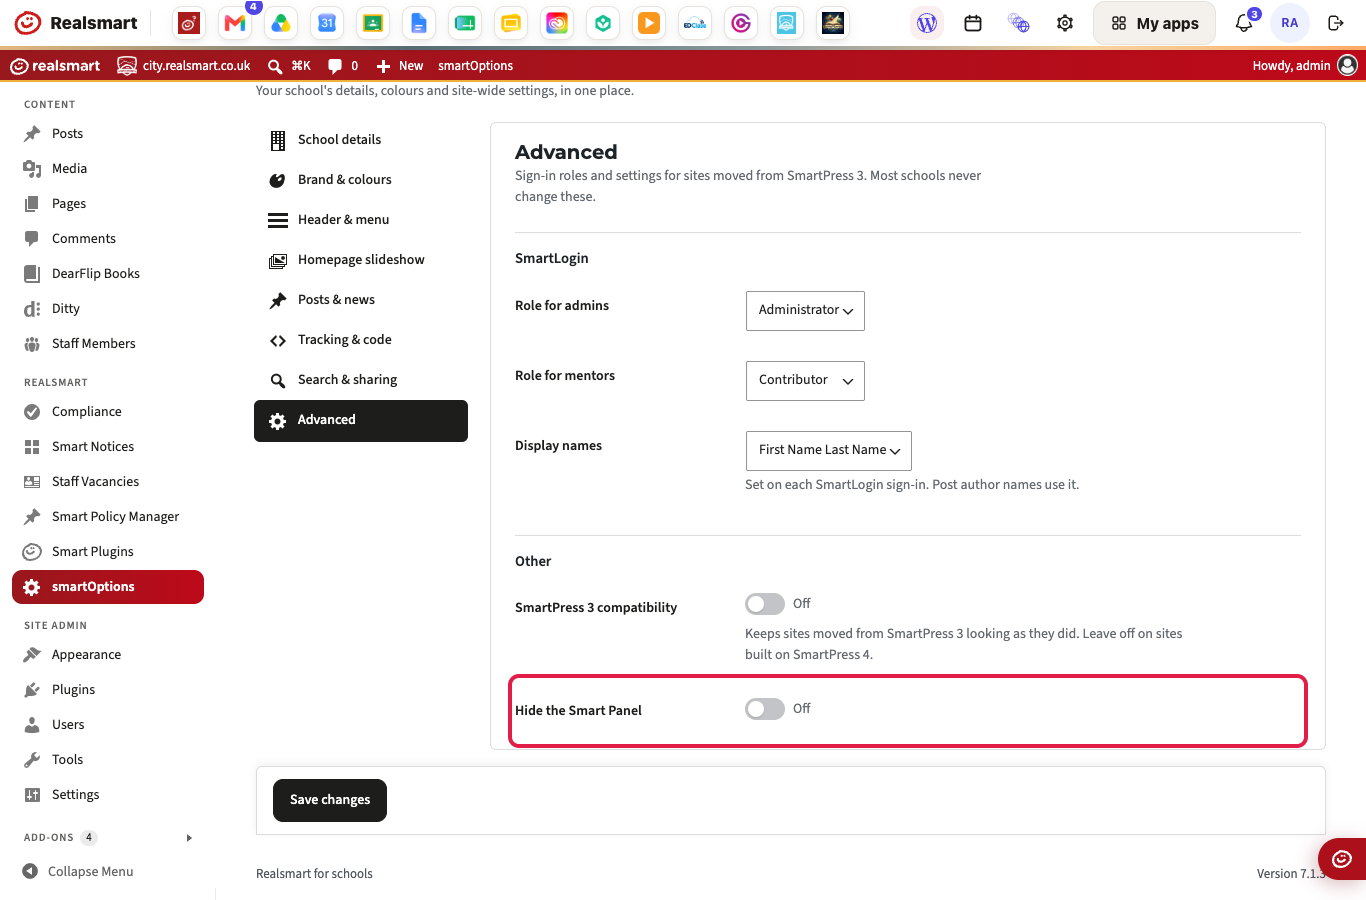
| Role for admins | The WordPress role given to your school's admin accounts when they sign in through SmartLogin, your school's single sign-on. It is applied every time they sign in | Administrator |
| Role for mentors | The WordPress role given to a staff (mentor) account the first time it signs in. Staff who have signed in before keep the role they already have | Contributor |
| Display names | How each person's name is shown, including as a post author: First Name Last Name, First Name Only, Last Name First Name or Last Name Only. Set on each SmartLogin sign-in, except that websites moved from SmartPress 3 keep existing names under First Name Last Name. To shorten or hide names on posts, use Author names under Posts & news | First Name Last Name |
| SmartPress 3 compatibility | Keeps websites moved from SmartPress 3, Realsmart's previous platform, looking as they did. It is not on for every moved website. Leave it as it is unless Realsmart support asks you to change it | Off |
| Hide the Smart Panel | Hides the login bar at the top of the page from visitors who are not signed in. Signed-in users still see it. Use the [login_link] shortcode to put a login link somewhere else instead. See Smart Panel |
Off |
Realsmart staff accounts always get the Administrator role, whatever Role for admins is set to.
Troubleshooting
I cannot see smartOptions
Why it happens: smartOptions is only shown to administrators.
How to fix it: Ask an administrator at your school to make the change.
My change is not showing on the website
Why it happens: The change was not saved, the setting depends on another one, or your browser is showing an older copy of the page.
How to fix it:
- Go back to smartOptions and click Save changes. Check for Settings saved. at the top of the page.
- Check related settings: the header only shows the parts ticked under Show in the header; Menu bar colour needs Menu in its own bar on; the slideshow needs Show the slideshow on and only appears on the homepage.
- If you use Smart CSS, it can override colours and fonts set here.
- Reload the website in a private browser window.
It says "Settings saved, apart from:"
Why it happens: One or more boxes held something that could not be saved, for example an email address that is not one, or a tracking box with no ID in it. Everything else was saved.
How to fix it: Read the list under the message, correct those boxes and click Save changes again.
"Leave without saving?" keeps appearing
Why it happens: You have changed something on the page and not saved it yet. smartOptions asks before you leave so the change is not lost.
How to fix it: Click Save changes to keep your changes, or Leave without saving to throw them away.
The slideshow does not show for me when I am signed in
Why it happens: When logged in is unticked under Also show, so only visitors who are not signed in see it.
How to fix it: Tick When logged in in Homepage slideshow and click Save changes.
A slide is missing from the slideshow
Why it happens: The slide has dates under More options → When it shows, and today is outside them. Its row shows Not showing today.
How to fix it: Open the slide, click More options, and change or clear the From and Until (inclusive) dates. Then click Save changes.
I cannot type in the code boxes
Why it happens: Your account is not allowed to save code, so the code editors (Analytics code, Marketing code, CSS, Overlay HTML and Button CSS) are shown read-only, with the note "Your account cannot save code, so this is shown read-only."
How to fix it: Ask Realsmart support to add the code for you.
Staff cannot publish posts
Why it happens: Staff accounts have the Contributor role, which lets them write posts but not publish them. Contributor is the default Role for mentors.
How to fix it:
- For staff who have not signed in yet, change Role for mentors in Advanced (for example to Editor) and click Save changes.
- Role for mentors is only used the first time someone signs in, so for staff who already have an account, change their role under Users instead.
Did this work for you?
If a step looked different on your site, tell us and we'll update the screenshots.
Thanks for your feedback.