Google OU settings
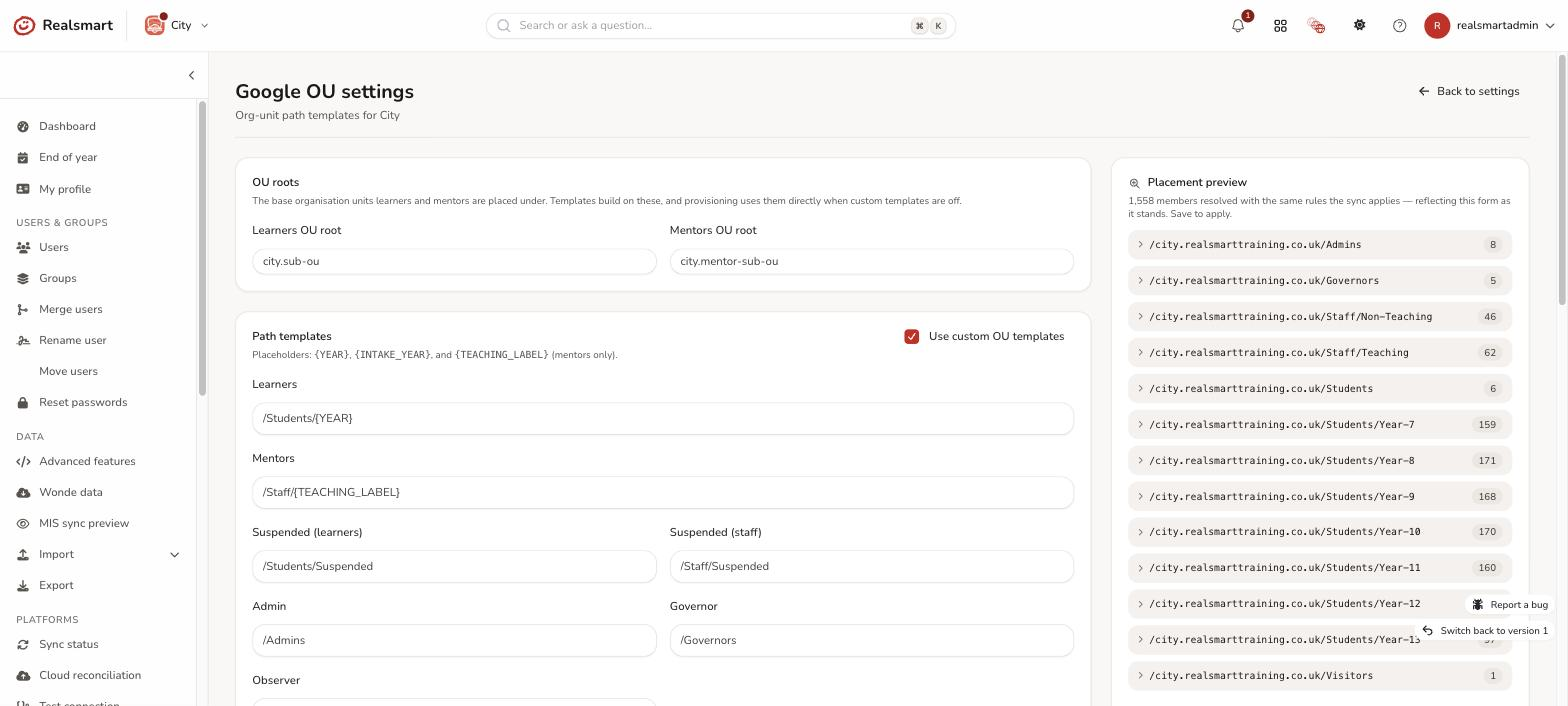
In Google Workspace, every account lives in an organisation unit (OU) — a folder-like path that decides which policies and apps apply to that user. This page controls where Realsmart places each of your users in that structure. It has three parts: the OU roots, the path templates that build on them, and the year mappings — plus a live placement preview that shows who will land where.
These settings moved here from the old Sync tab; they weren't removed. The sync still uses the OU roots as the base path (and uses them directly when custom templates are off).
Before you start
- You must be a school admin with sync settings permission, with the school selected in the switcher.
- Your members' year groups drive the year mappings, so make sure your MIS import is current first.
The two building blocks
- OU roots — the base OU for learners and one for mentors (e.g.
Learners,Mentors). Everything is placed under these. - Path templates — optional finer placement built on the roots, using placeholders the sync fills in per user:
{YEAR}— the user's (mapped) year group{INTAKE_YEAR}— the user's (mapped) intake year{TEACHING_LABEL}— mentors only — resolves to your teaching or non-teaching label
Templates are only used when Use custom OU templates is ticked. With it off, the sync places users directly under the OU roots.
Steps
Step 1: Open Google OU settings
In the sidebar, open Google Workspace → OU settings.
Step 2: Set the OU roots
In OU roots, enter the base organisation units for Learners and Mentors (for example Learners and Mentors). These are the foundation the templates build on and, with templates off, exactly where users are placed.
Step 3: Set the path templates (optional)
Tick Use custom OU templates to place users more precisely, then fill in the templates. Every path starts with a /:
- Learners — e.g.
/Learners/{YEAR}places each learner in a sub-OU for their year group. - Mentors — e.g.
/Mentors/{TEACHING_LABEL}splits staff into teaching and non-teaching sub-OUs. - Suspended (learners) and Suspended (staff) — where suspended accounts go. A suspended account stays managed while it sits there: if the person comes back and is made active again, the sync moves them back out to their normal OU rather than leaving them behind with the leavers.
- Admin, Governor, Observer — paths for those account types.
- Teaching label and Non-teaching label — the words
{TEACHING_LABEL}resolves to (defaults:TeachingandNon-Teaching).
Only {YEAR}, {INTAKE_YEAR} and (for the mentors template) {TEACHING_LABEL} are valid placeholders; the page rejects an unknown one.
Step 4: Set year mappings
The Year mappings table controls how each MIS year value fills {YEAR} and {INTAKE_YEAR}. It's pre-populated with a suggested row per year group found on your members. For each row, set the mb_year key (the raw value from your MIS), the {YEAR} value it should produce, and the {INTAKE_YEAR} value. Add row creates a new mapping; the cross removes one. Any year left unmapped uses its raw value.
Step 5: Check the placement preview, then save
The Placement preview panel on the right shows your school's real members grouped by the OU each would land in, resolved with the same rules the sync applies and reflecting the form as it currently stands (before you've even saved). Expand a group to see counts and a sample of names. Active/protected and suspended members are shown separately because they resolve through different rules.
Use it to confirm everyone lands where you expect — then select Save OU settings to make it live. Because the preview mirrors the real sync engine (and is kept in step by matching tests on both sides), what you see is what saving produces.
Related
Did this work for you?
If a step looked different on your site, tell us and we'll update the screenshots.
Thanks for your feedback.