Cache
Overview
To keep your website fast, the pages visitors see, and some of the settings behind them, are saved (cached) for a while rather than being rebuilt on every visit. Usually you will not notice this. But it can mean that after you save a change, a visitor briefly still sees the old version until the saved copy is cleared or expires on its own.
You only see the cache from the visitor's side. While you are signed in, every page you view is built fresh, so you may see your change while visitors do not. To see what visitors see, open the site in a private/incognito window.
The Cache tools let you clear the saved copies straight away. Only administrators can see or use them.
Getting set up
Step 1: Open Cache
Go to Tools → Cache. You can also click Cache in the black toolbar at the top of the screen; point at it to see a menu with Clear saved pages, Clear saved settings, Clear everything and Open cache tools.
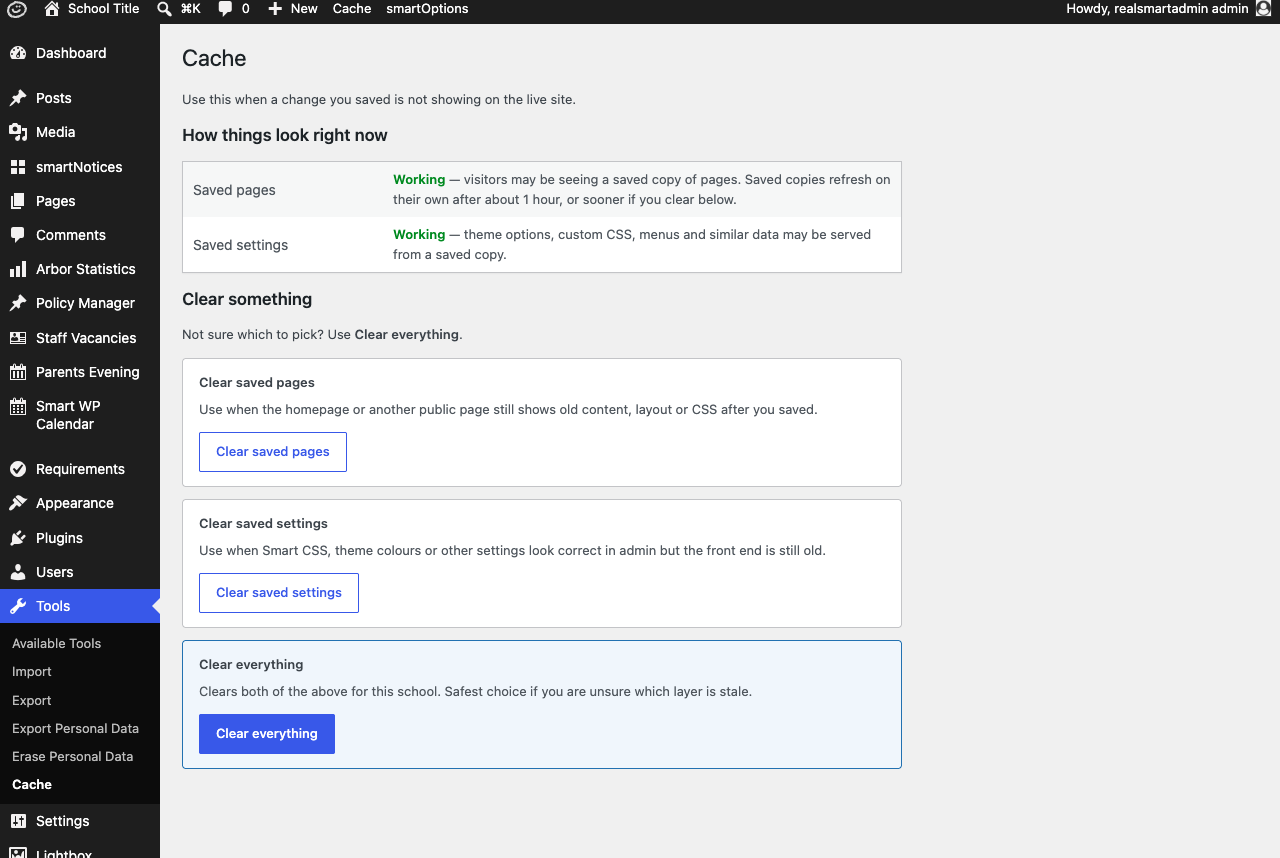
Step 2: Check "How things look right now"
The top of the Cache page tells you whether caching is working for your school:
- Saved pages: Working — visitors may be seeing a saved copy of pages. It shows how long saved copies last before they refresh on their own.
- Saved pages: Not available — pages are built fresh every time, or the cache server cannot be reached.
- Saved settings: Working — smartOptions, custom CSS, menus and similar data may be served from a saved copy.
- Saved settings: Limited — the site is running without a shared settings cache right now.
- Saved settings: Not available — settings are read fresh every time.
Step 3: Clear what you need
Click one of the three buttons on Tools → Cache, or choose the same option from the Cache menu in the toolbar:
- Clear saved pages — use when the homepage or another public page still shows old content, layout or styling after you saved a change.
- Clear saved settings — use when Smart CSS, theme colours or other settings look right in the admin area but the public site still shows the old version.
- Clear everything — clears both of the above for your school. Use this if you are not sure which one is out of date.
The clear happens straight away, and you stay on the screen you were on. Then open the page in a private/incognito window to check the change now shows.
Settings
Where to find it: Tools → Cache, or Cache in the toolbar
| Action | What it does |
|---|---|
| Clear saved pages | Marks every saved page for your school as out of date, so the next visit to each page builds it fresh |
| Clear saved settings | Clears the saved copy of settings such as smartOptions and Smart CSS |
| Clear everything | Does both of the above in one click |
There are no settings to change. Clearing only affects your own school's website.
When the cache clears itself
Saved pages refresh on their own after the time shown on the Cache page (normally about an hour). Most changes also clear the saved pages for the whole site automatically, including:
- saving, publishing, trashing or restoring a post or page
- editing a menu, widgets, categories or tags
- approving or editing a comment
- saving most Realsmart settings, such as smartOptions, Smart CSS and Smart Alert
So you only need to clear by hand when a change does not appear after one of these, or after a change made somewhere else.
Troubleshooting
I can see my change but visitors cannot
Why it happens: Signed-in staff always see freshly built pages, but visitors may be shown a saved copy.
How to fix it: Click Clear everything under Cache, then check the page in a private/incognito window.
A change still is not showing after Clear everything
Why it happens: If the Cache page shows Not available for saved pages, the cache is not the cause. Your own browser may be showing an old copy, or the change may not have saved.
How to fix it: Reload the page in a private/incognito window to rule out your browser's own cache. If the change is still missing, open it in the admin area to check it was saved, and save it again if not.
I cannot see the Cache menu
Why it happens: Cache is only shown to administrators.
How to fix it: Ask a school administrator to clear the cache for you.
Did this work for you?
If a step looked different on your site, tell us and we'll update the screenshots.
Thanks for your feedback.