Trace a user's activity across the trust
A person can exist in more than one school in your trust. When something goes wrong for them — a Google account not provisioning, an Entra error — you previously had to open each school's logs separately and stitch the picture together. User log trace does that for you: one search, the whole trust, in a single timeline.
It follows a simple path: discover → surface → fix.
Before you start
- You must be a MAT admin, in MAT mode (All schools selected in the switcher).
- You only ever see the schools you're authorised for — never beyond your trust.
How a user is matched across schools
The trace correlates a person by their username (exact). A username is the local part of the Google / Entra email (username@school-domain), so it's the same key the cloud platforms use — the most reliable way to tie the same person together across schools.
Check the identities. A username can, rarely, belong to two different people in two different schools. The page shows every matched record — school, name, status — so you can confirm they're the same person before trusting the combined timeline. If a person has a different username in each school, trace each username separately.
Steps
Step 1: Open the trace
In the MAT sidebar under Users & Groups, select User log trace. Or, from Find a user, click Trace on any row to jump straight in with that username.
Step 2: Search the user
Type the exact username (e.g. aaron.cooper). Use the Time window, Platform (Google / Entra / Active Directory / MIS / Fetch / Apple) and Outcome (errors only / success) filters to narrow the view.
Step 3: Read the per-school health (Surface)
Each school the user is found in gets a card showing:
- Their account status (Active / Suspended / Deleted) in that school.
- Sync health — In sync, N errors, or No activity in the window. A school with an unresolved error is outlined in red.
- Event count and when they were last active.
The header shows the total errors across the trust in the window, so a problem stands out immediately.
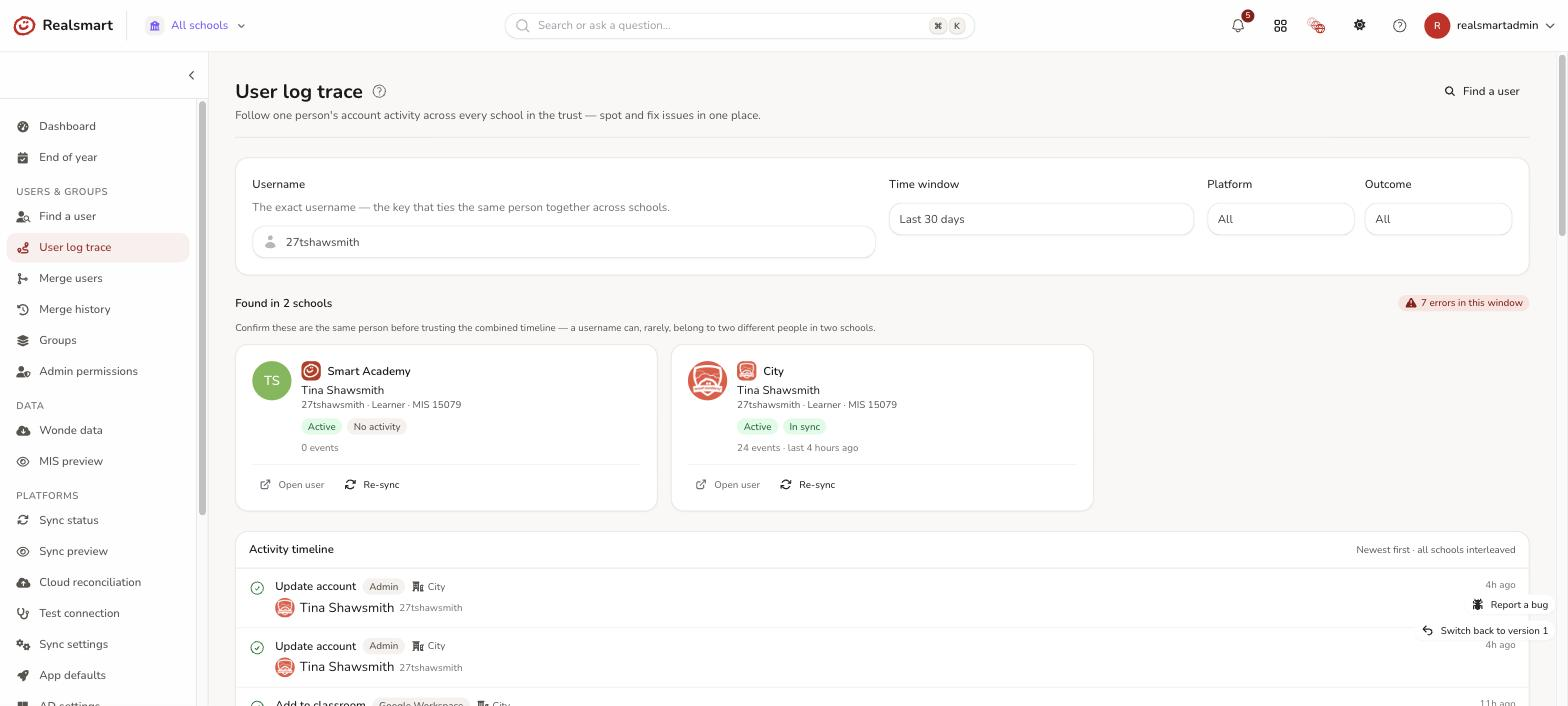
Step 4: Read the combined timeline
Below the cards, every event for the person — across all their schools — is interleaved newest first, each row labelled with the school it came from. That's how you see cross-school cause and effect (a change in one school preceding a failure in another).
Error rows are highlighted and show the real, formatted error (the actual API message), expandable and copyable — not a vague "Unknown error".
Step 5: Fix (or jump to the fix)
On each school card:
- Re-sync — re-queues that account for provisioning in that school (the "try again" fix). Safe, scoped to the one school, and recorded in that school's logs.
- Open user — switches you into that school and opens the user's edit page, where you can make changes directly.
Troubleshooting
- "A school is missing from the results" — the person may have a different username there. Trace that username too. (The trace matches on exact username by design, to avoid merging two different people.)
- "I see two different people under one username" — they genuinely share a username across schools. Treat each school's record on its own; don't assume the timeline is one person.
- "Re-sync didn't fix it" — open the user in that school to check their details, or review the error detail in the timeline (it carries the actual platform message to act on).
Related
Did this work for you?
If a step looked different on your site, tell us and we'll update the screenshots.
Thanks for your feedback.