All guides / Security-compliance
Smart Alert Plus
Overview
Where Smart Alert shows one fixed message you type yourself, Smart Alert Plus builds a banner automatically from your most recent posts in a category you choose. It is useful when you have several related announcements — exam timetables, event reminders, a run of safeguarding updates — and you would rather keep publishing normal posts than edit an alert by hand each time.
You choose the category, how many posts to pull in, which parts of each post to display (title, excerpt, image, date, and more), and the banner colours.
Getting set up
Step 1: Create a category for your alerts
Create a WordPress category to hold the posts you want to appear in the banner — something like "Urgent Notices" works well. Keep it exclusive to time-sensitive posts, so the banner does not fill up with routine news. The category is available to choose in Step 3 as soon as you create it, even though it has no posts in it yet.
Step 2: Open Smart Alert Plus
Make sure Smart Alert Plus is switched on in Smart Plugins, then go to Smart Plugins → Smart Alert Plus.
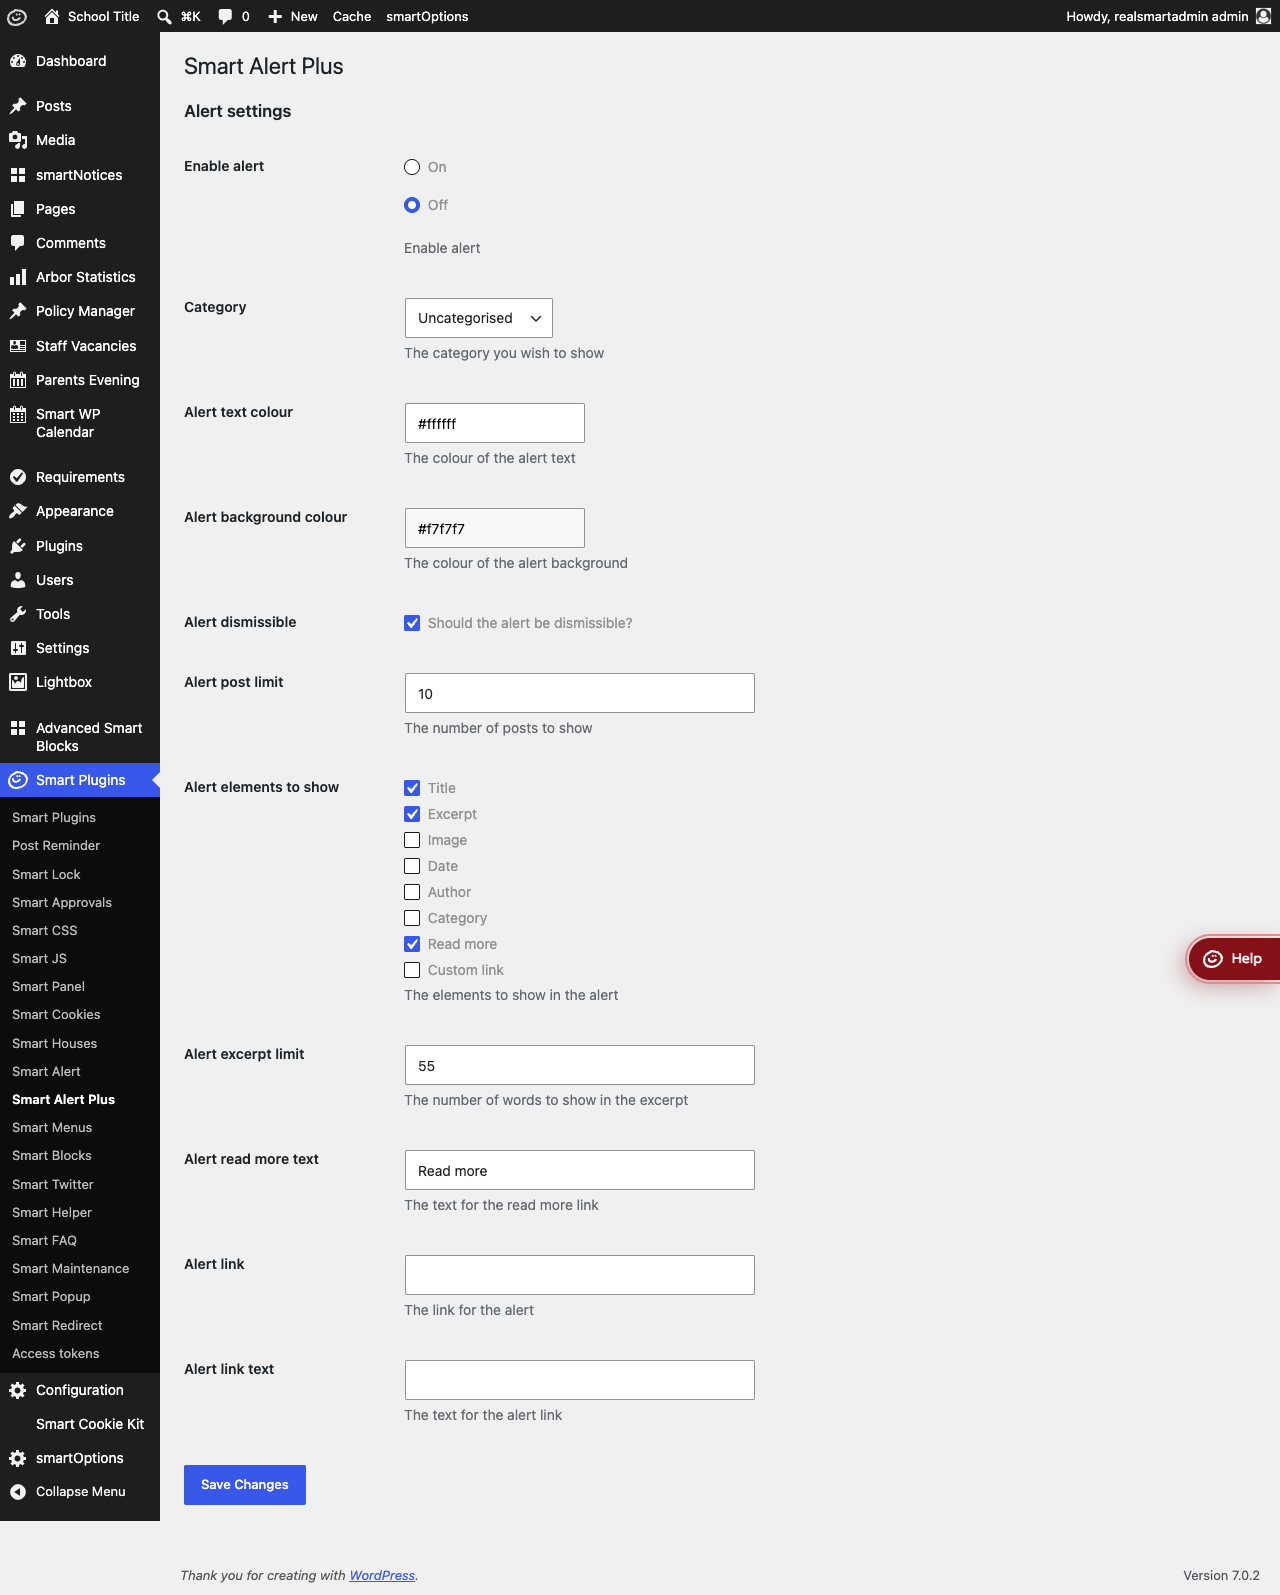
Step 3: Choose the category and set it to On
Set Category to the category you created, set Enable alert to On, and choose which Alert elements to show — Title, Excerpt, Image, Date, Author, Category, Read more, and Custom link are all available. Select Save Changes.
Step 4: Publish a post
Publish a post in that category. Visit your website — the post appears in the banner automatically, with no further editing needed. Publishing another post in the category adds it too, up to Alert post limit.
Settings
Where to find it: Smart Plugins → Smart Alert Plus
| Setting | What it does | Default |
|---|---|---|
| Enable alert | Turns the banner on or off | Off |
| Category | Which category's posts feed the banner. A brand-new category with no posts in it yet is still listed and can be chosen straight away | The first category in the list (usually Uncategorised) until you choose one |
| Alert text colour | Colour of the banner text | #ffffff (white) |
| Alert background colour | Colour of the banner background | #ff0000 (red) |
| Alert dismissible | Shows a close button on the banner. Closing it only hides it on the page the visitor is looking at — it appears again on the next page | On |
| Alert post limit | Maximum number of posts shown at once | 5 |
| Alert elements to show | Which parts of each post appear — Title, Excerpt, Image, Date, Author, Category, Read more, Custom link | Title, Excerpt, Image, Read more |
| Alert excerpt limit | Number of words shown for the Excerpt element, taken from the start of the post's text | 55 |
| Alert read more text | Label on the "read more" link | Read more |
| Alert link | Web address for the Custom link element, a single link shown after the posts | Empty |
| Alert link text | Set aside for the Custom link's label, but the banner currently always uses Alert read more text for it instead — leave this field blank | Empty |
The banner only appears when the chosen category has at least one published post, on top of Enable alert being On.
Troubleshooting
No posts appear in the banner
- Confirm Smart Alert Plus is switched on in Smart Plugins.
- Confirm Enable alert is set to On on the Smart Alert Plus page, and Save Changes was selected.
- Check that the selected Category has at least one published post.
The banner shows the wrong link label on Custom link
Alert link text has no effect at the moment — the label always follows Alert read more text, whatever you set Alert link text to. Set the wording you want in Alert read more text instead.
The banner comes back after a visitor closes it
This is how Smart Alert Plus works: the close button hides the banner on the current page only, and it is shown again on the next page the visitor opens. To take it down for everyone, set Enable alert to Off.
Too many posts, or the wrong ones
Lower Alert post limit, or move older posts out of the alerts category into your regular news category — the banner always shows the most recent posts in the category you have chosen, up to that limit.
Did this work for you?
If a step looked different on your site, tell us and we'll update the screenshots.
Thanks for your feedback.